
Посібник користувача CleverControl
Як створити обліковий запис
Щоб розпочати роботу з CleverControl, виконайте такі прості кроки:
- Зареєструйте обліковий запис, відвідавши https://dashboard.clevercontrol.com/register або натиснувши кнопку «Безкоштовна пробна версія» у верхньому правому куті веб-сайту.
- Вкажіть своє ім’я, номер телефону, назву компанії та дійсну адресу електронної пошти.
- Створіть пароль для свого облікового запису.
- Натисніть кнопку «Зареєструватися», щоб завершити процес реєстрації.

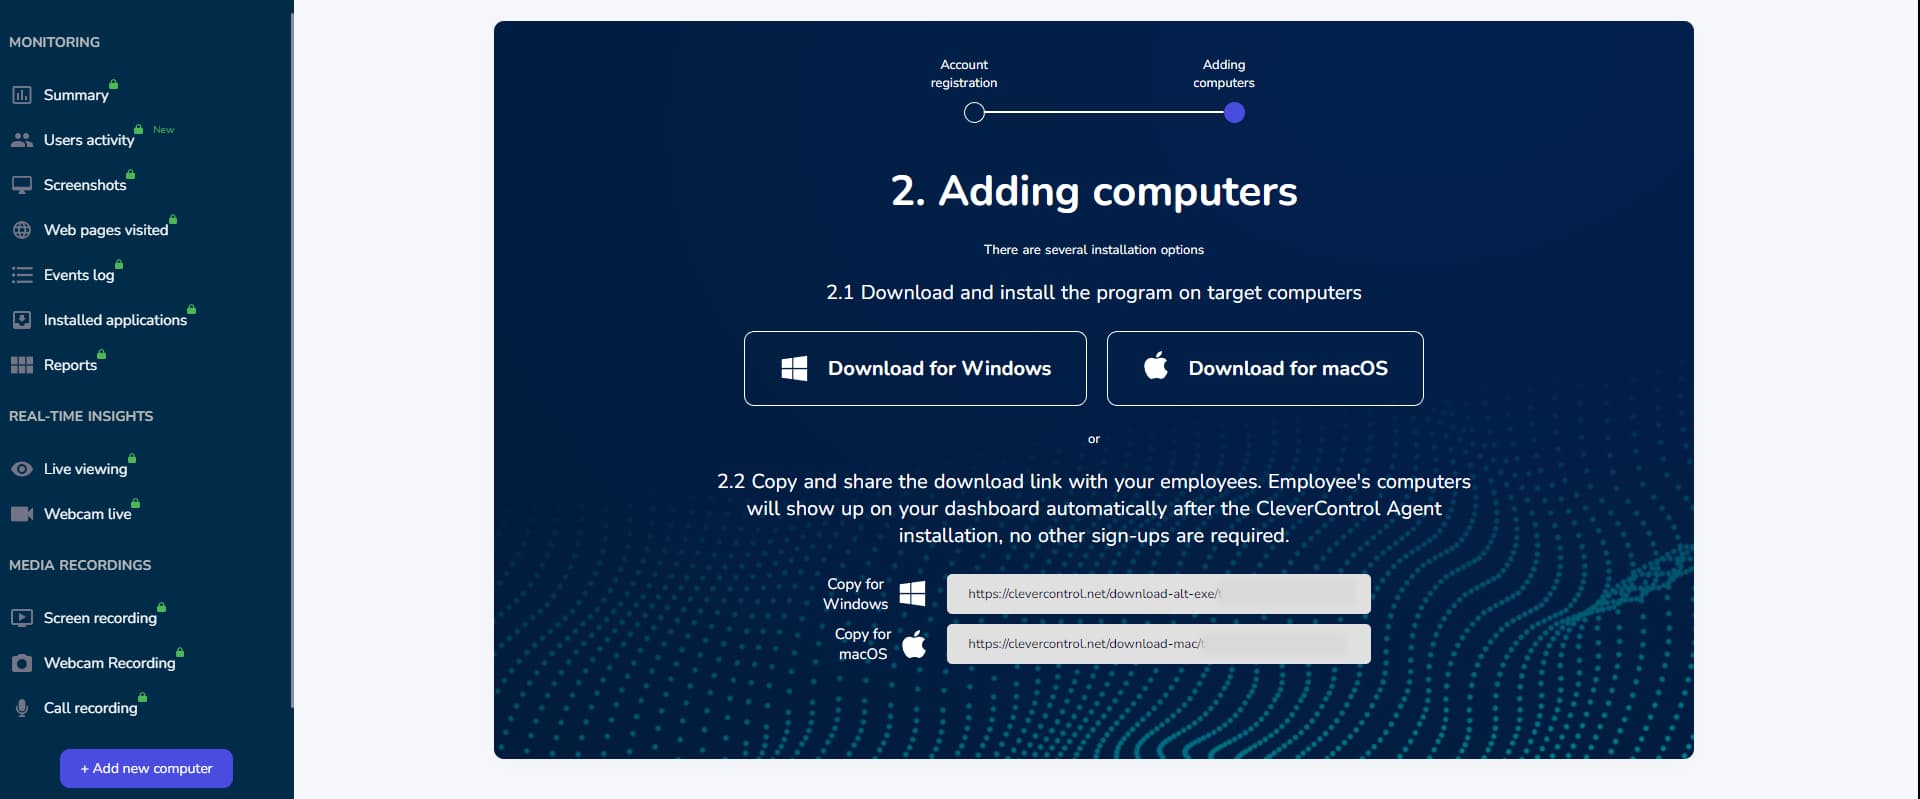
Як додати комп'ютери до облікового запису
Додати комп’ютери до свого облікового запису CleverControl легко і займає лише кілька хвилин. Ось як:
Виберіть версію вашої операційної системи:
- Увійшовши до свого онлайн-облікового запису, ви знайдете інструкції щодо додавання комп’ютера.
- Важлива примітка: CleverControl слід встановлювати лише на тих комп’ютерах, які ви збираєтеся контролювати. Встановлювати програму на комп’ютер адміністратора не потрібно.
- Виберіть відповідну версію для вашої операційної системи та завантажте її.
Пізніше ви можете скористатися кнопкою «Додати новий комп’ютер» угорі, щоб завантажити файл інсталятора та додати більше комп’ютерів до облікового запису.
Встановлення CleverControl на Windows:
- Запустіть завантажений файл інсталятора на комп’ютері та дотримуйтеся наведених нижче інструкцій.
- Посібник з інсталяції Windows
- Посібник з інсталяції macOS
- Після встановлення програма автоматично підключиться до вашого облікового запису. Контрольований комп’ютер з’явиться у вашому обліковому записі протягом 5-10 хвилин.

Як переглянути звіти про діяльність
Всі зібрані дані про активність доступні у вашому онлайн-акаунті. Дані фільтруються за кількома категоріями, такими як Скріншоти, відвідані веб-сайти, тощо для вашої зручності. Більшість з цих категорій ви можете знайти в розділі Журнал подій розділ.

Щоб переглянути детальну інформацію про активність користувача в хронологічному порядку, перейдіть до розділу Журнал подій і виберіть вкладку Всі події на цій вкладці.
Для огляду активності користувачів перейдіть до розділу Резюме вкладка. За замовчуванням відображається підсумкова інформація для всіх підключених комп’ютерів.
Щоб зосередитися на конкретних співробітниках або комп'ютерах, використовуйте Всі комп'ютери фільтр у верхній частині сторінки.
За потреби налаштуйте підсумковий період за допомогою фільтра часу.

Як експортувати дані з дашборду
Експорт даних з інформаційної панелі CleverControl є простим процесом. Ось як ви можете це зробити:
- Перейдіть до розділу Звіти на панелі приладів.
- Натисніть на кнопку Запросити новий звіт кнопку, щоб розпочати процес експорту.
Налаштуйте свій звіт. У параметрах виберіть:
- Конкретний період, який потрібно охопити у звіті.
- Користувач або користувачі, чиї дані потрібно включити.
- Тип подій, які слід включити у звіт, як-от усі події, знімки екрана, відвідані веб-сторінки тощо.
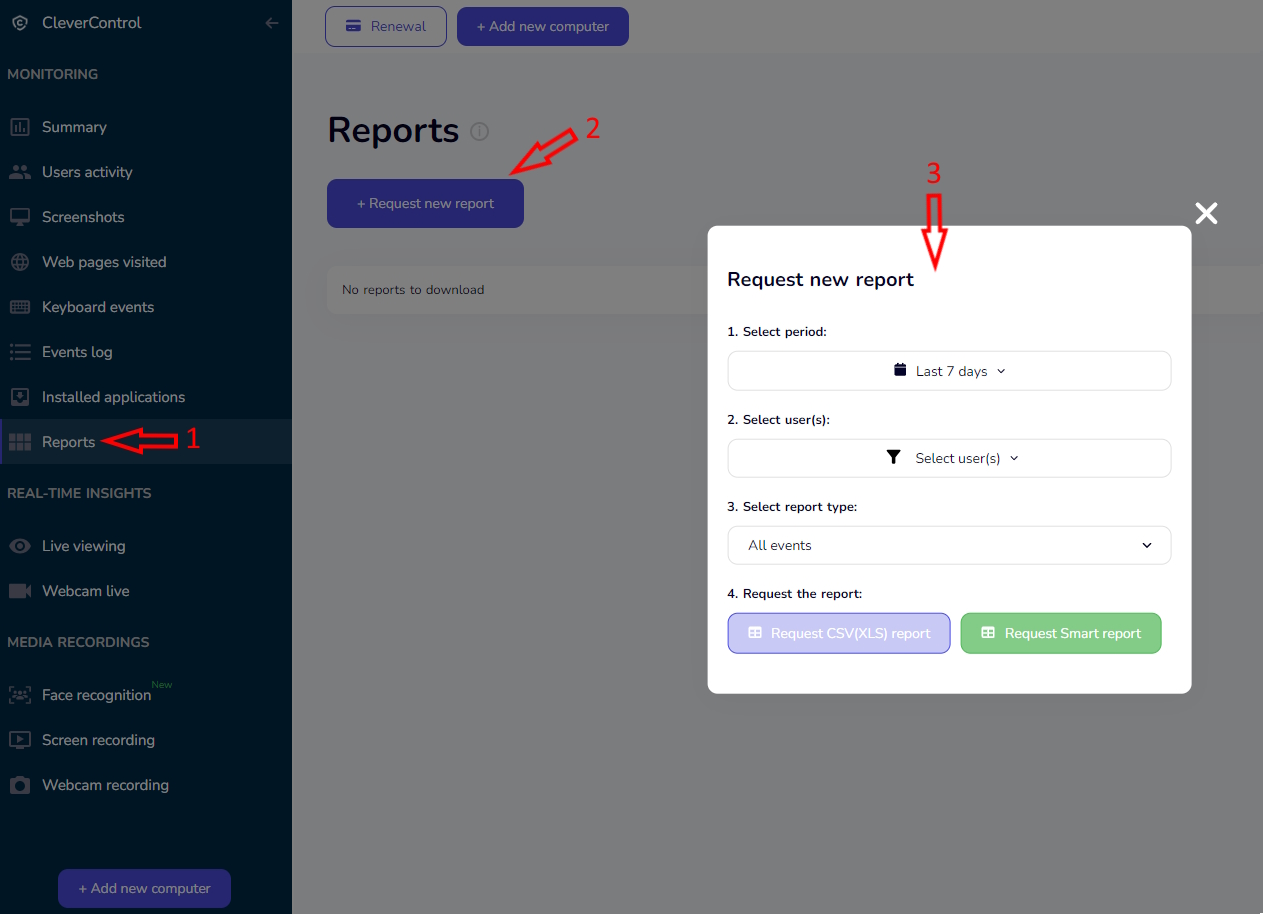
Виберіть формат звіту. У вас є два варіанти:
- Звіт CSV: Містить текстову інформацію, наприклад історію веб-сайтів і пошукові запити.
- Розумний звіт: Включає текст і медіажурнали, як-от знімки екрана. Зауважте, що розумні звіти завантажуються у форматі .zip і вимагають вилучення за допомогою безкоштовно доступного програмного забезпечення, наприклад 7-Zip.
Завантажити та переглянути:
- Вибравши потрібний формат, натисніть кнопку з вибраним типом звіту.
- Звіт буде готовий через кілька хвилин. Коли він буде готовий, ви можете завантажити його на тій же сторінці.
- Зауважте, що ані CSV, ані розумні звіти не містять підсумкової активності чи діаграм статистики користувачів.

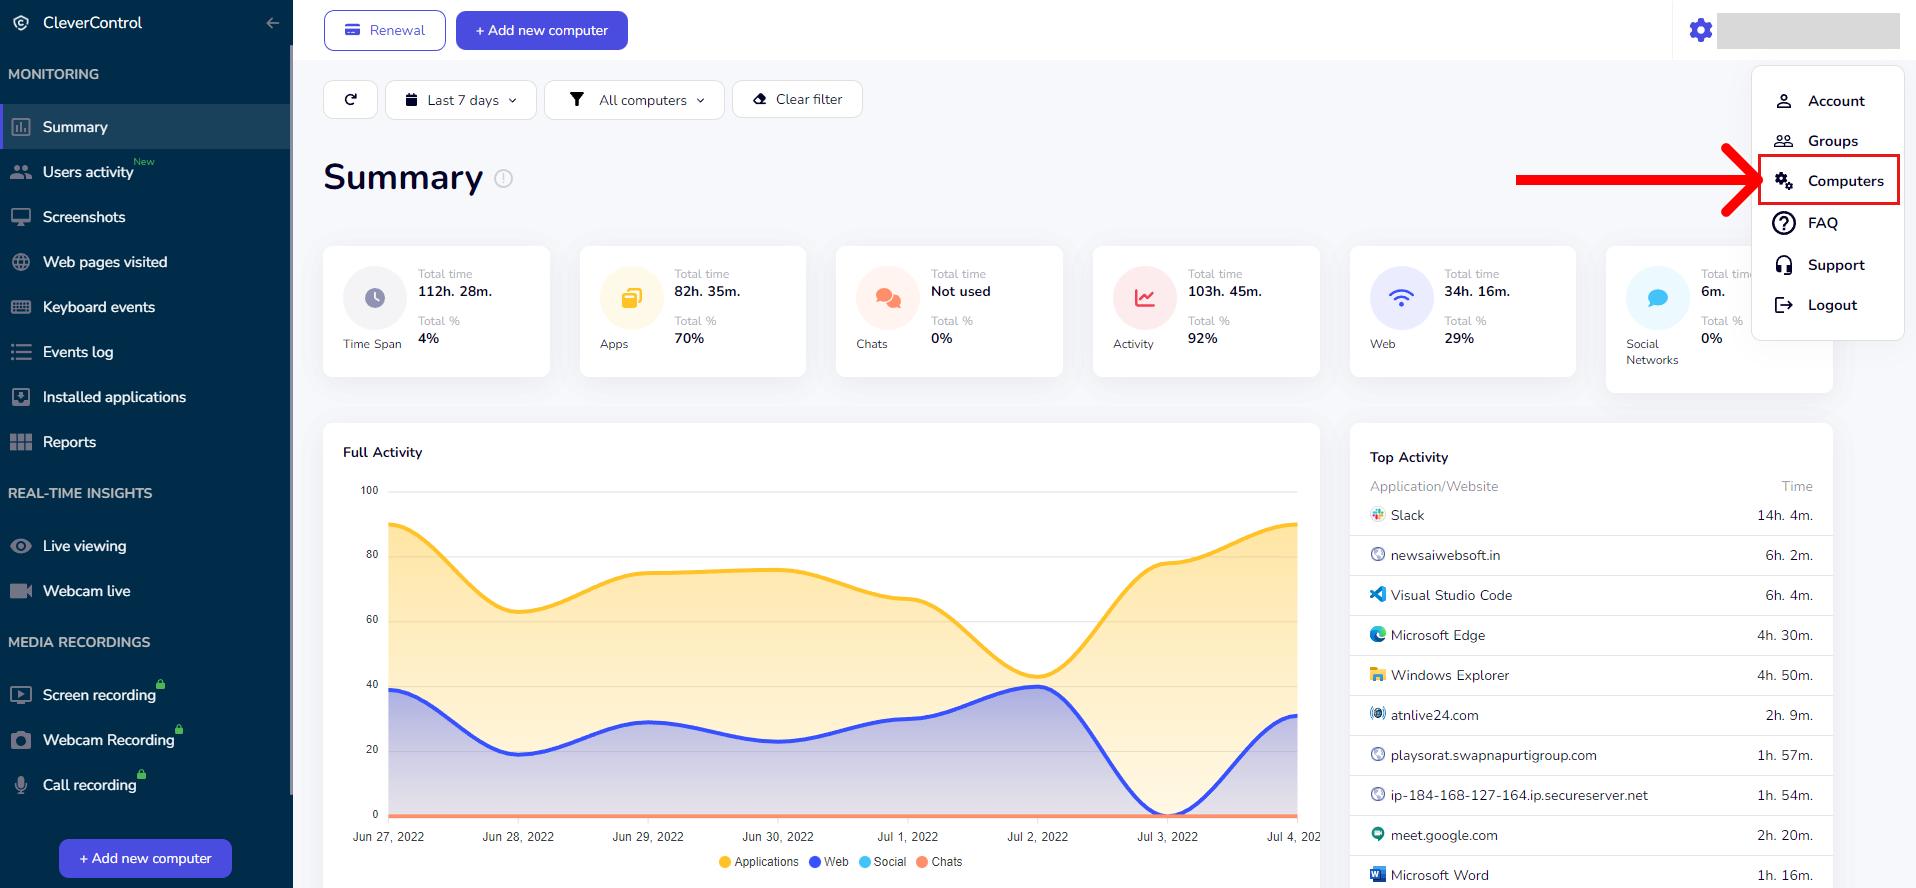
Як змінити налаштування моніторингу
Ви можете налаштувати параметри CleverControl, щоб оптимізувати відстеження співробітників. Налаштуйте конфігурацію відповідно до ваших конкретних потреб для підвищення ефективності моніторингу. Ось як це зробити:
Налаштування моніторингу доступу:
- Натисніть свою електронну адресу у верхньому правому куті інформаційної панелі.
- У випадаючому меню виберіть комп'ютери.
Керувати комп'ютерами. Ви побачите список комп’ютерів, підключених до вашого облікового запису. Тут ви можете:
- Відредагуйте назву кожного комп’ютера.
- Запуск або припинення моніторингу всього комп’ютера або окремих користувачів.
- Увімкніть або вимкніть додаткові функції відстеження екрана.
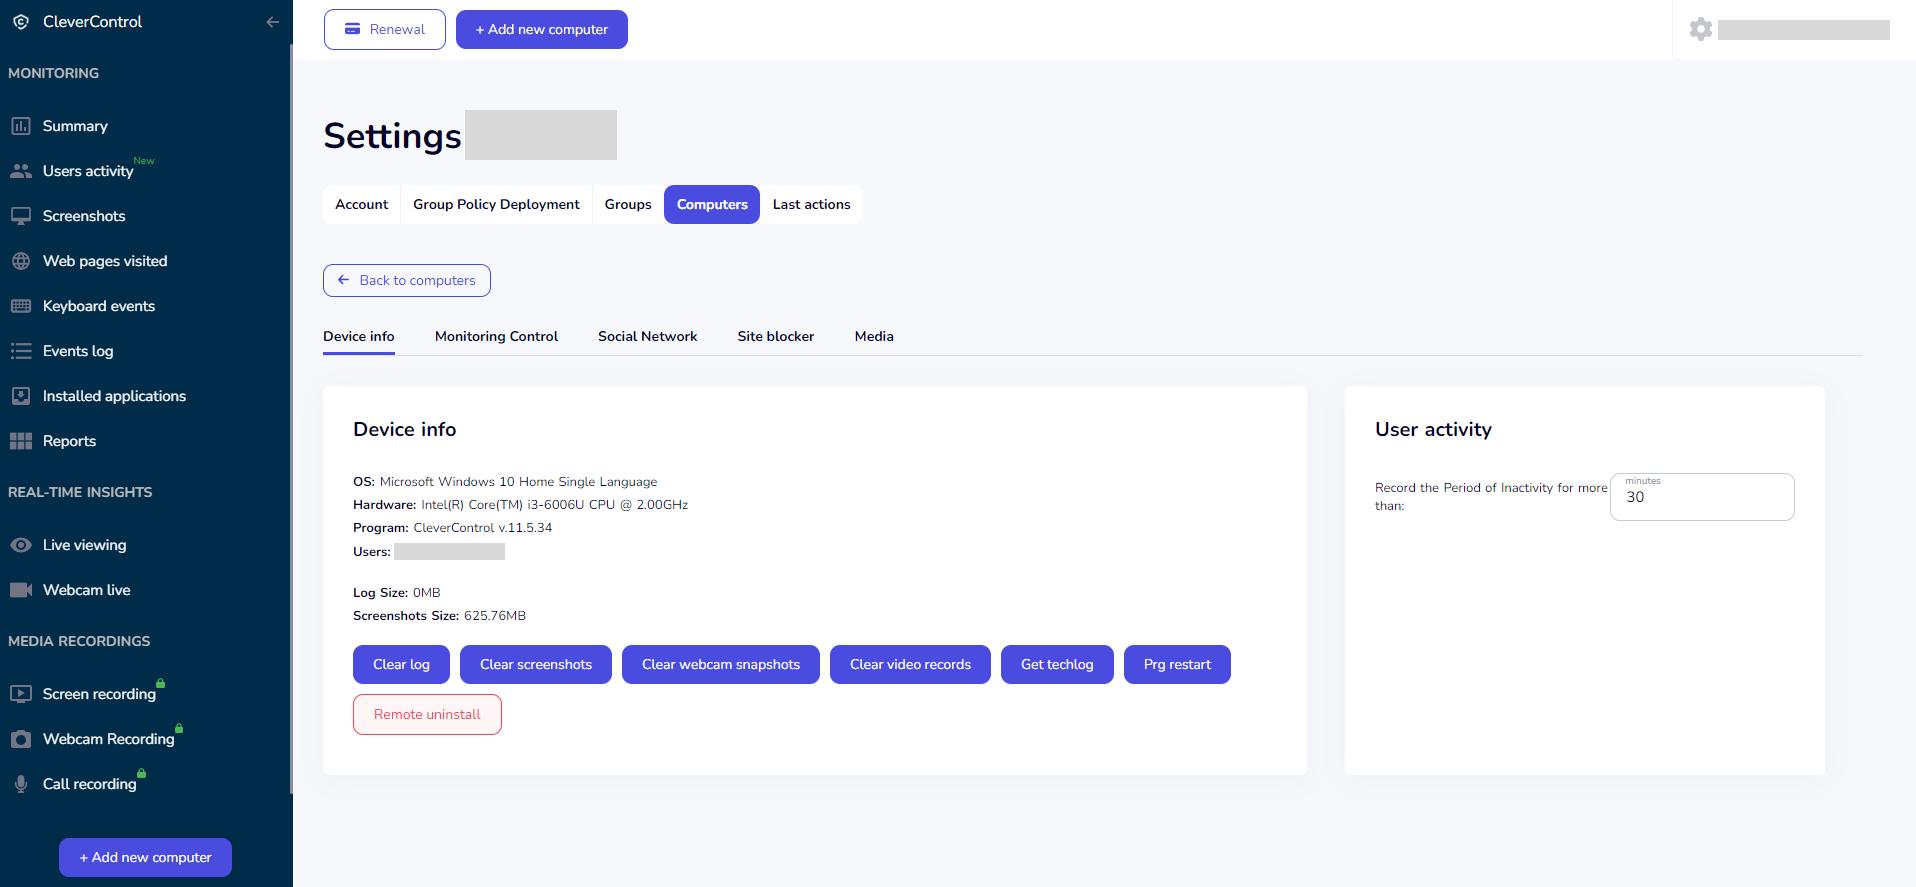
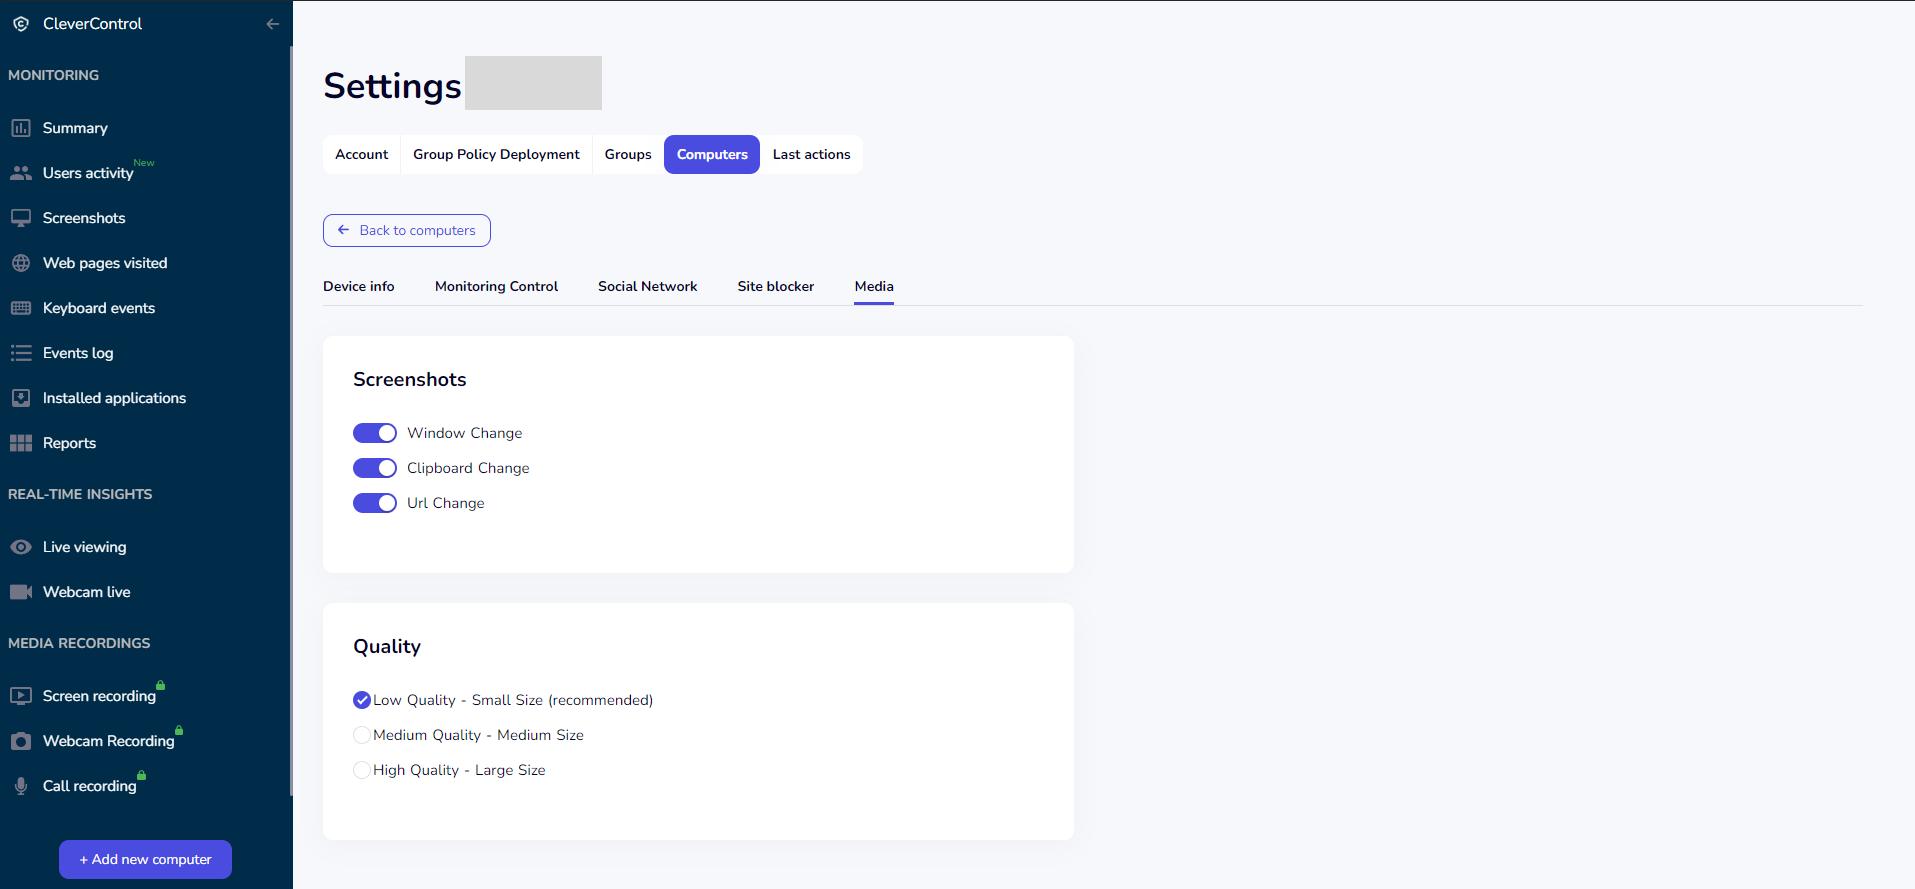
Точна настройка налаштувань. Для подальшого налаштування параметрів моніторингу натисніть «Налаштувати комп’ютер» під назвою комп’ютера.
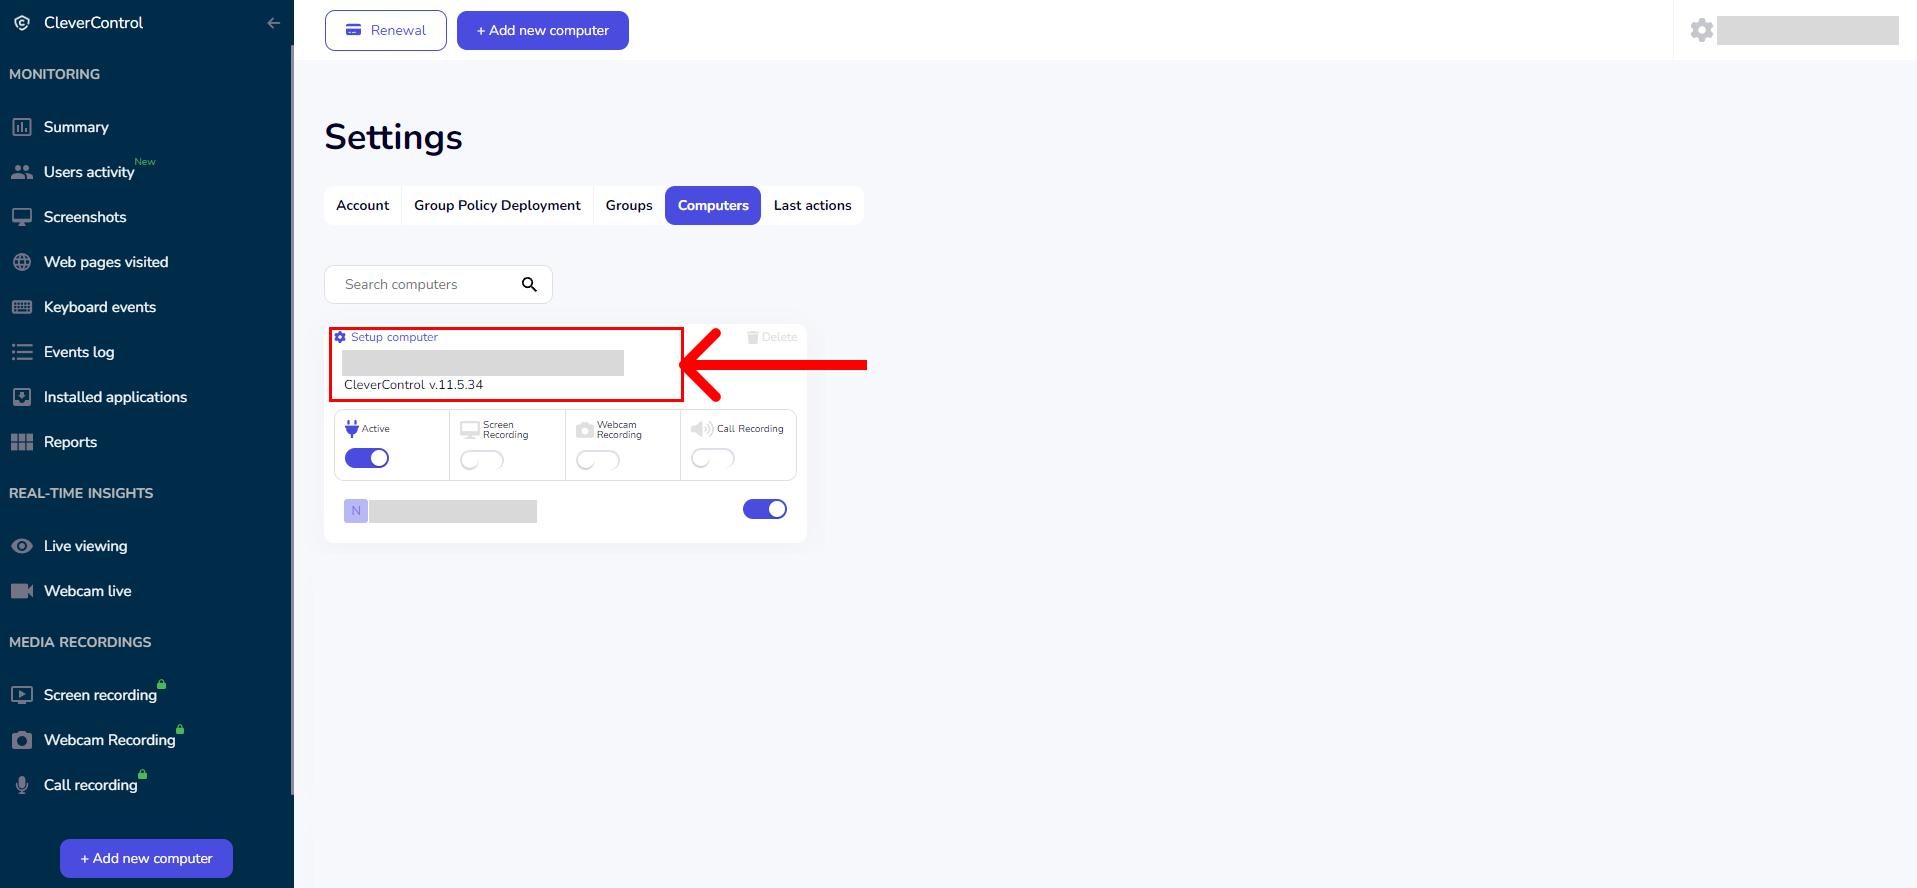


Для зручності налаштування розділені на шість розділів:
Інформація про пристрій: Надає інформацію про вашу операційну систему та версію агента CleverControl. Ви також можете видалити певні типи журналів з контрольованого комп’ютера або віддалено заблокувати програму, натиснувши «Remote Uninstall». Ця кнопка не видаляє програму з цільового комп’ютера, але припиняє моніторинг. Видалення можна виконати лише безпосередньо на цільовому комп’ютері.
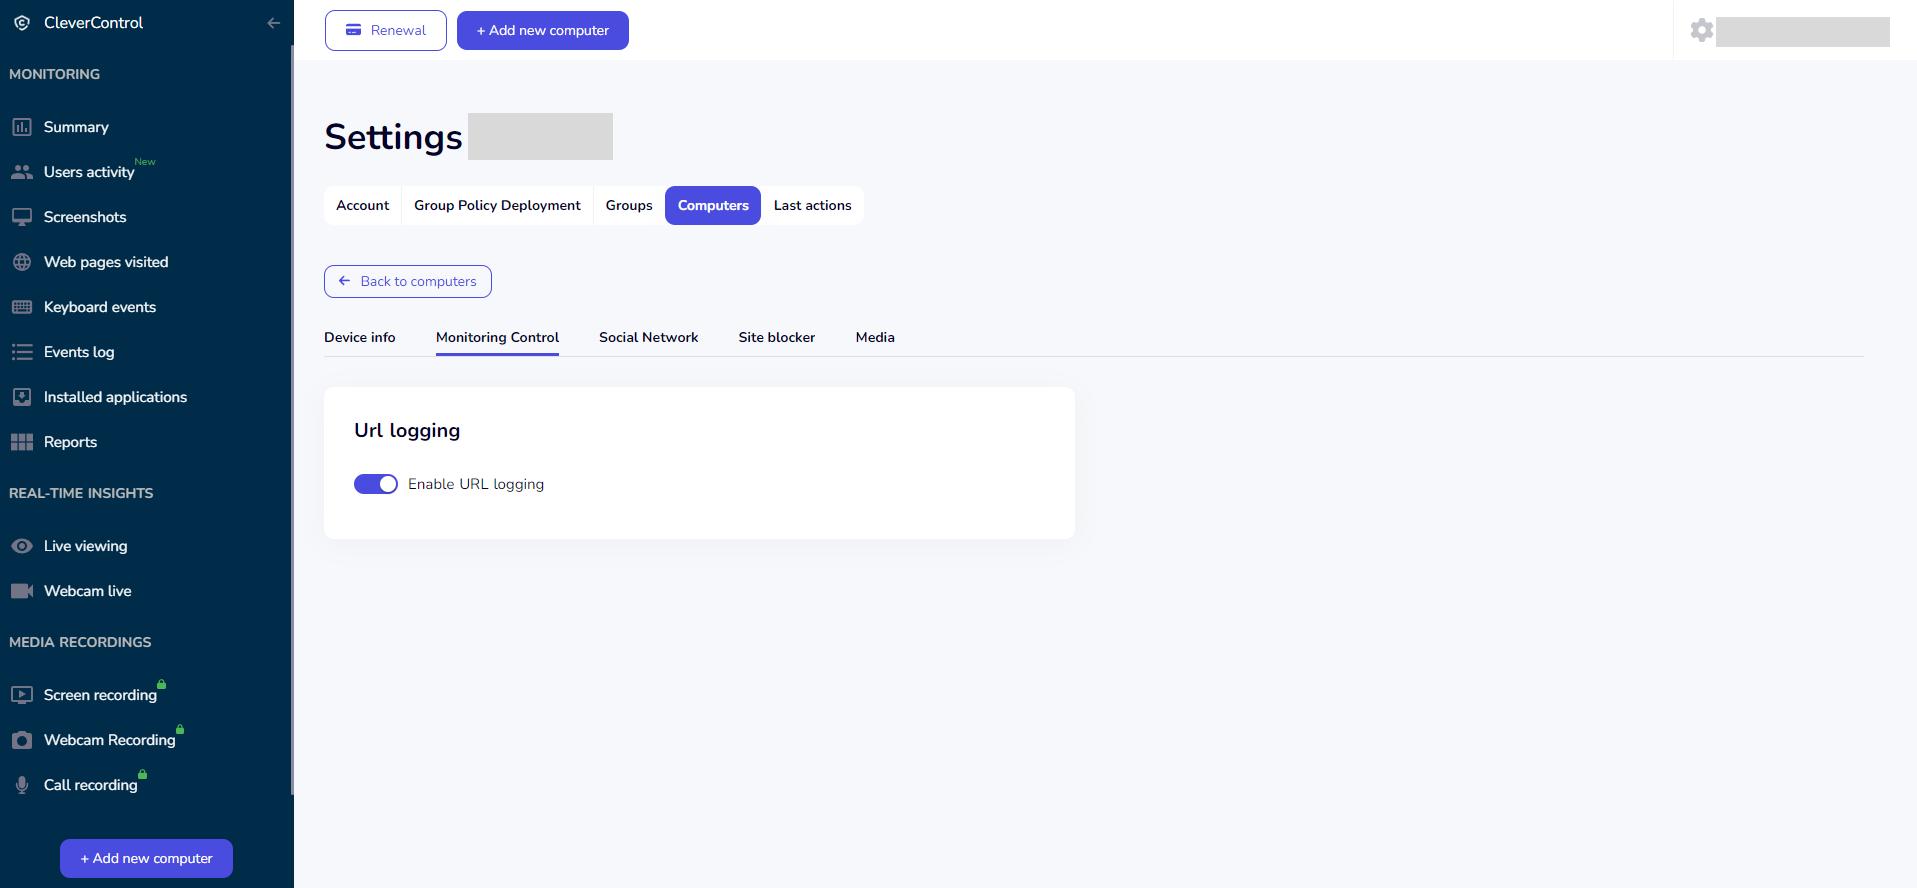
Контроль моніторингу: Керуйте подіями буфера обміну та відстеженням URL-адрес.
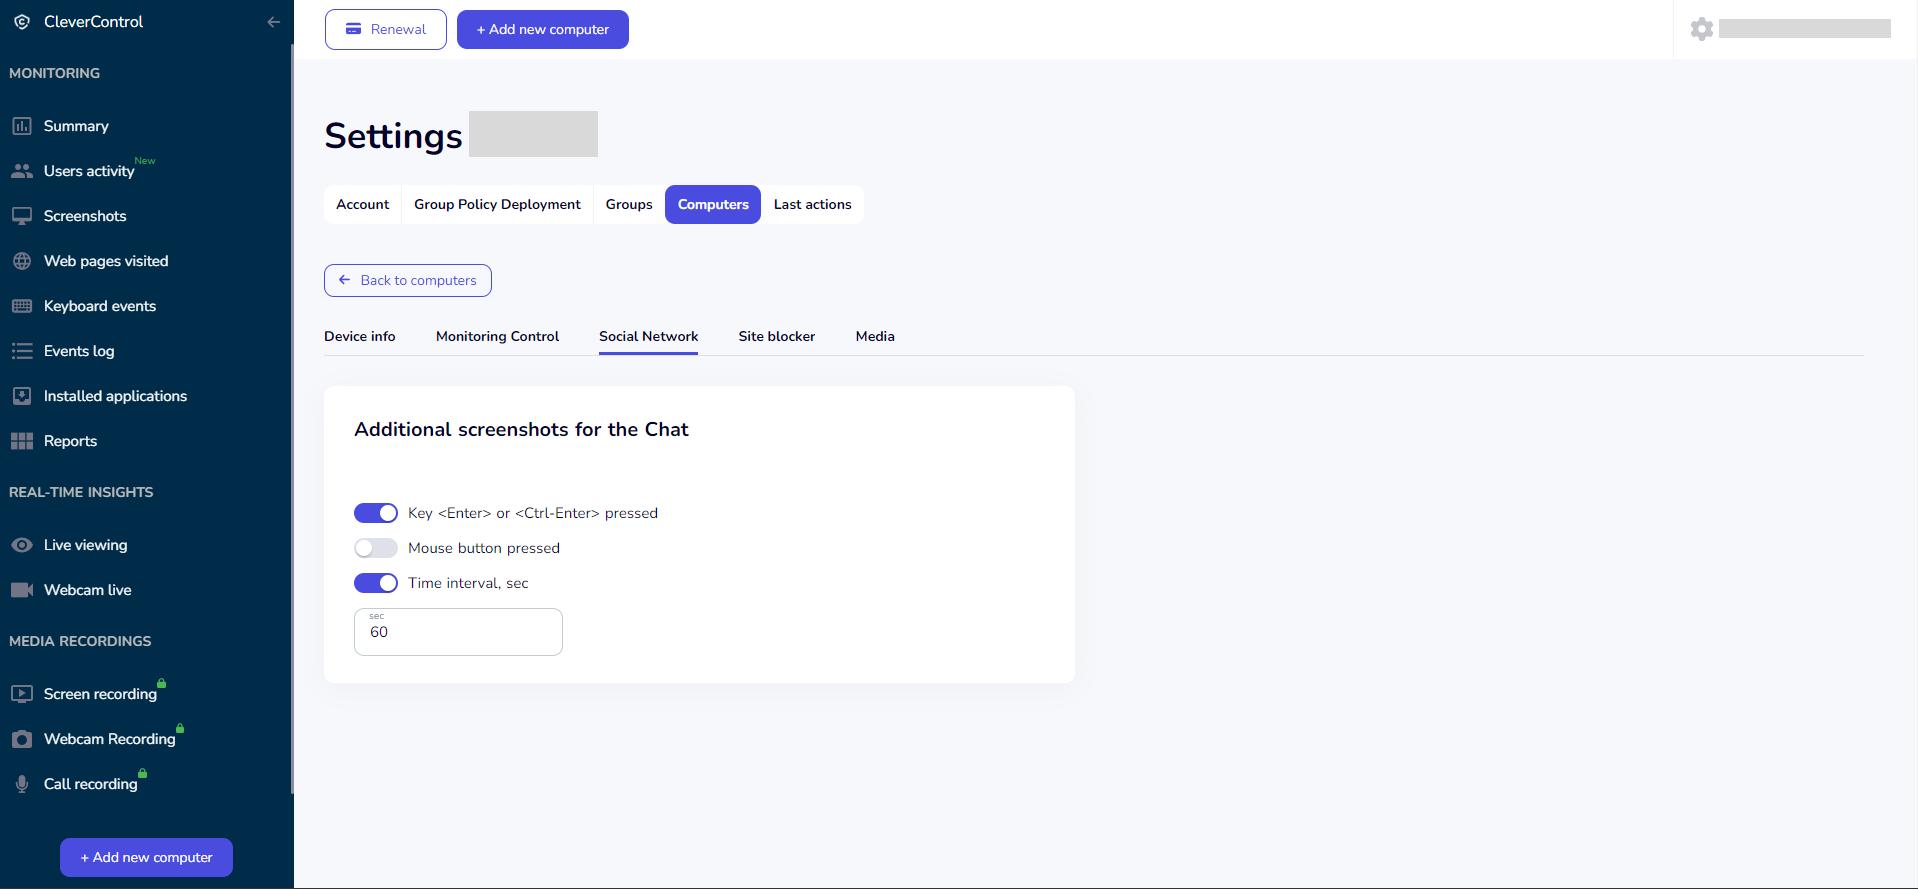
Соціальні мережі: Налаштуйте додаткові скріншоти для чатів і встановіть тригери скріншотів (часові інтервали, клавіша Enter, Ctrl+Enter і клацання мишею).
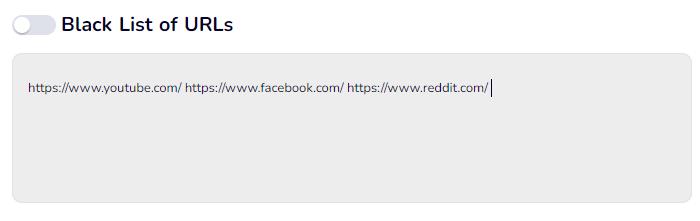
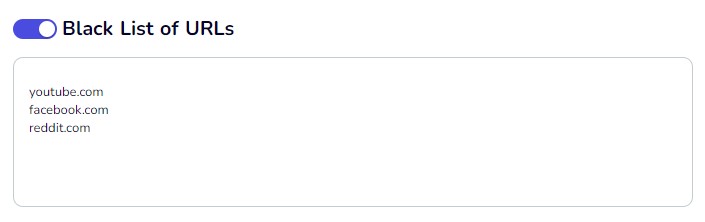
Блокувальник сайтів: Заблокуйте доступ до небажаних веб-сайтів, додавши їх URL-адреси до чорного списку.
Блокувати категорії веб-сайтів за допомогою Чорний список категорій.
Ви також можете вказати ключові слова в полі Чорний список слів щоб заблокувати сайти, які містять їх у своїх URL-адресах.
У "The Білий список опція дозволяє залишити доступ до сайту, навіть якщо він належить до заблокованої групи.
Наприклад, ви можете заблокувати всі соціальні мережі, залишивши доступ до facebook.com.
Щоб заблокувати всі сайти, крім дозволених, встановіть прапорець Тільки білий список URL-адрес і введіть дозволені веб-сайти в поле нижче.
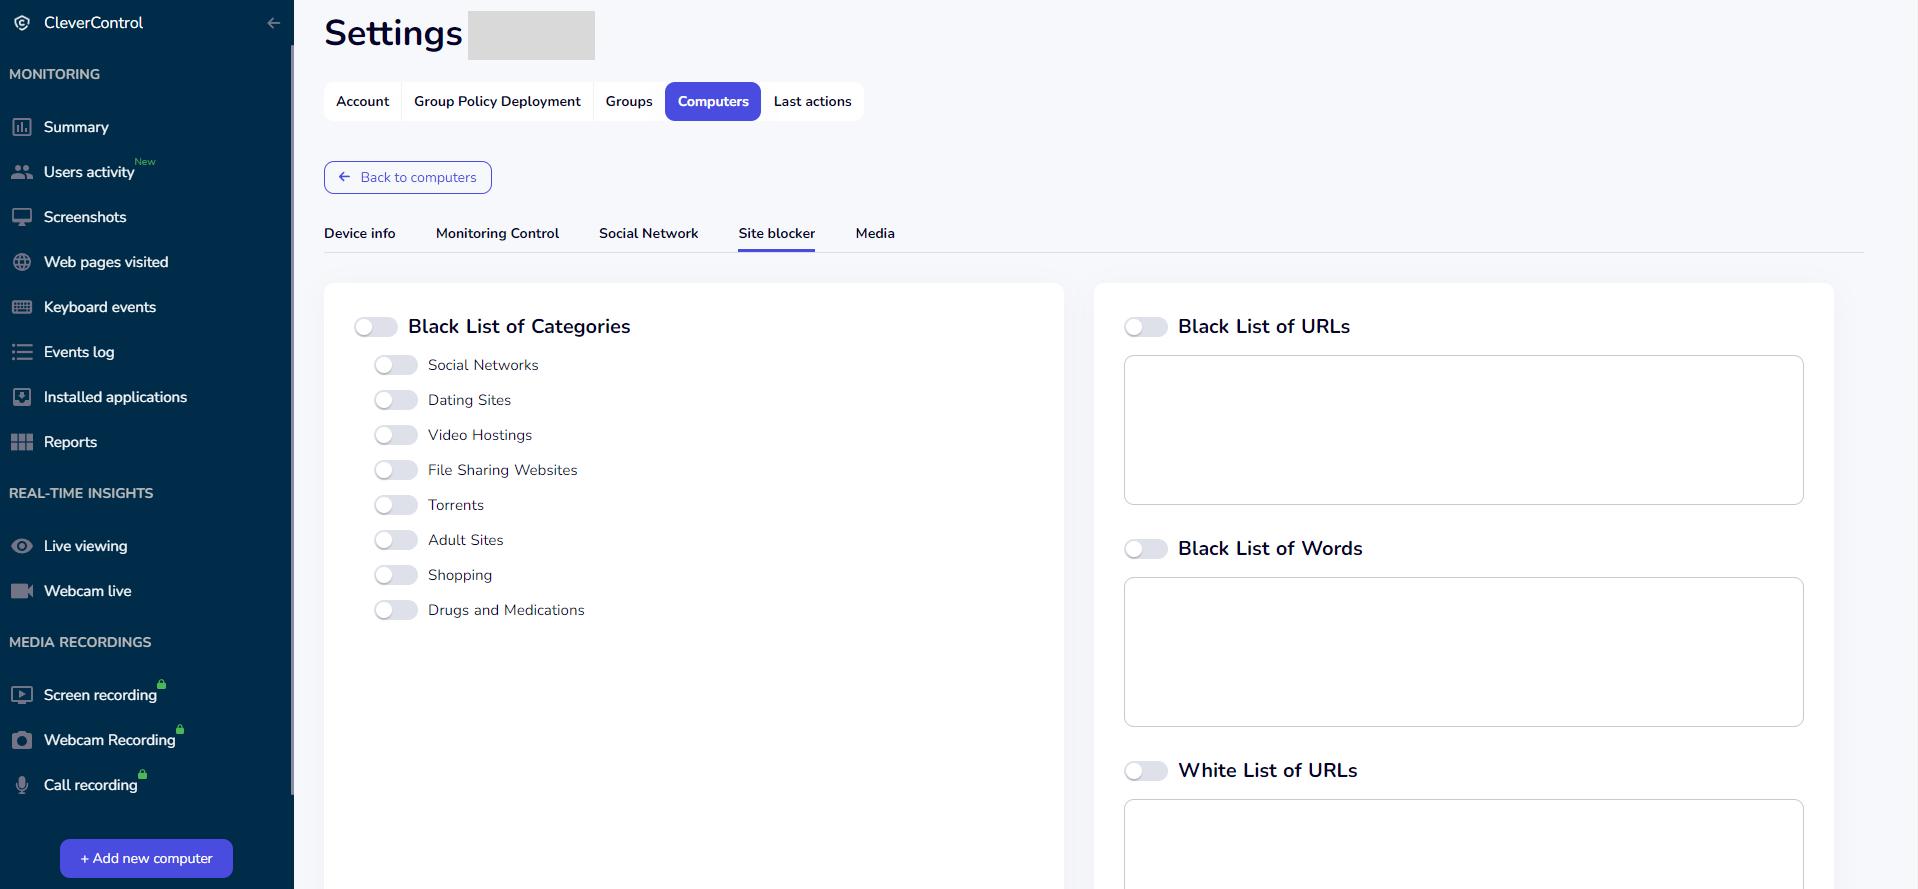
Важливе зауваження: Ви повинні вводити URL-адреси веб-сайтів без www. або https:// у налаштуваннях блокувальника сайтів. Якщо сайтів декілька, вводьте кожен з нового рядка.
ЗМІ: Налаштуйте тригери знімків екрана (зміна вікна, зміна URL-адреси, зміна буфера обміну та якість).


Як розташувати комп'ютери в групах
Організація кількох підключених комп’ютерів у групи для зручності керування є практичною функцією CleverControl. Ось як ви можете це зробити:
Керування групою доступу:
- Натисніть свою адресу електронної пошти у верхньому правому куті екрана.
- У випадаючому меню виберіть Групи.
Створити нову групу:
- Щоб створити нову групу, натисніть кнопку Додати нову групу кнопку.
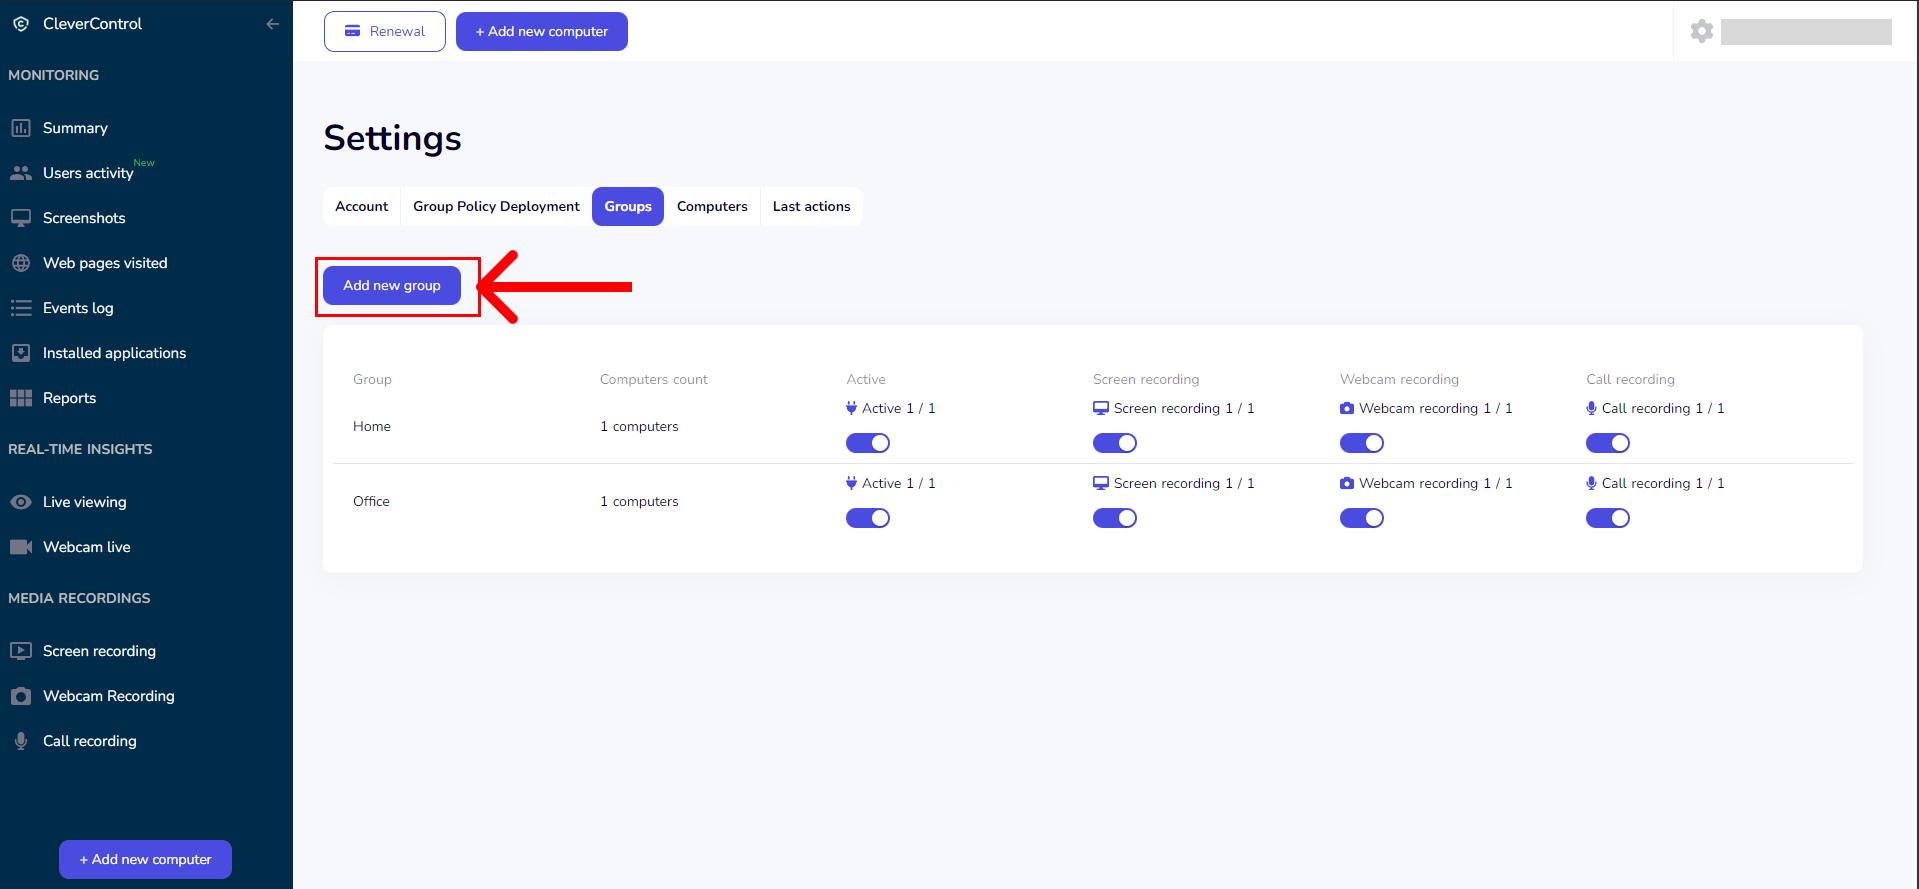
- Введіть назву для групи.
- Позначте комп’ютери, які ви хочете включити до цієї групи.
- Якщо ви раніше створювали групи, ви можете скористатися кнопкою-перемикачем «Комп’ютери без груп». Він дозволяє ідентифікувати комп’ютери, які ще не були віднесені до жодної групи.
- Щоб створити нову групу, натисніть кнопку Додати нову групу кнопку.

Як видалити програму
Щоб видалити CleverControl, виконайте такі дії залежно від операційної системи контрольованого комп’ютера: