
Guida all'uso di CleverControl
Come creare un account
To get started with CleverControl, follow these simple steps:
- Sign up for an account by visiting https://dashboard.clevercontrol.com/register or clicking the "Free Trial" button at the top right corner of the website.
- Provide your name, phone number, company name, and a valid email address.
- Create a password for your account.
- Click the "Sign Up" button to complete the registration process.

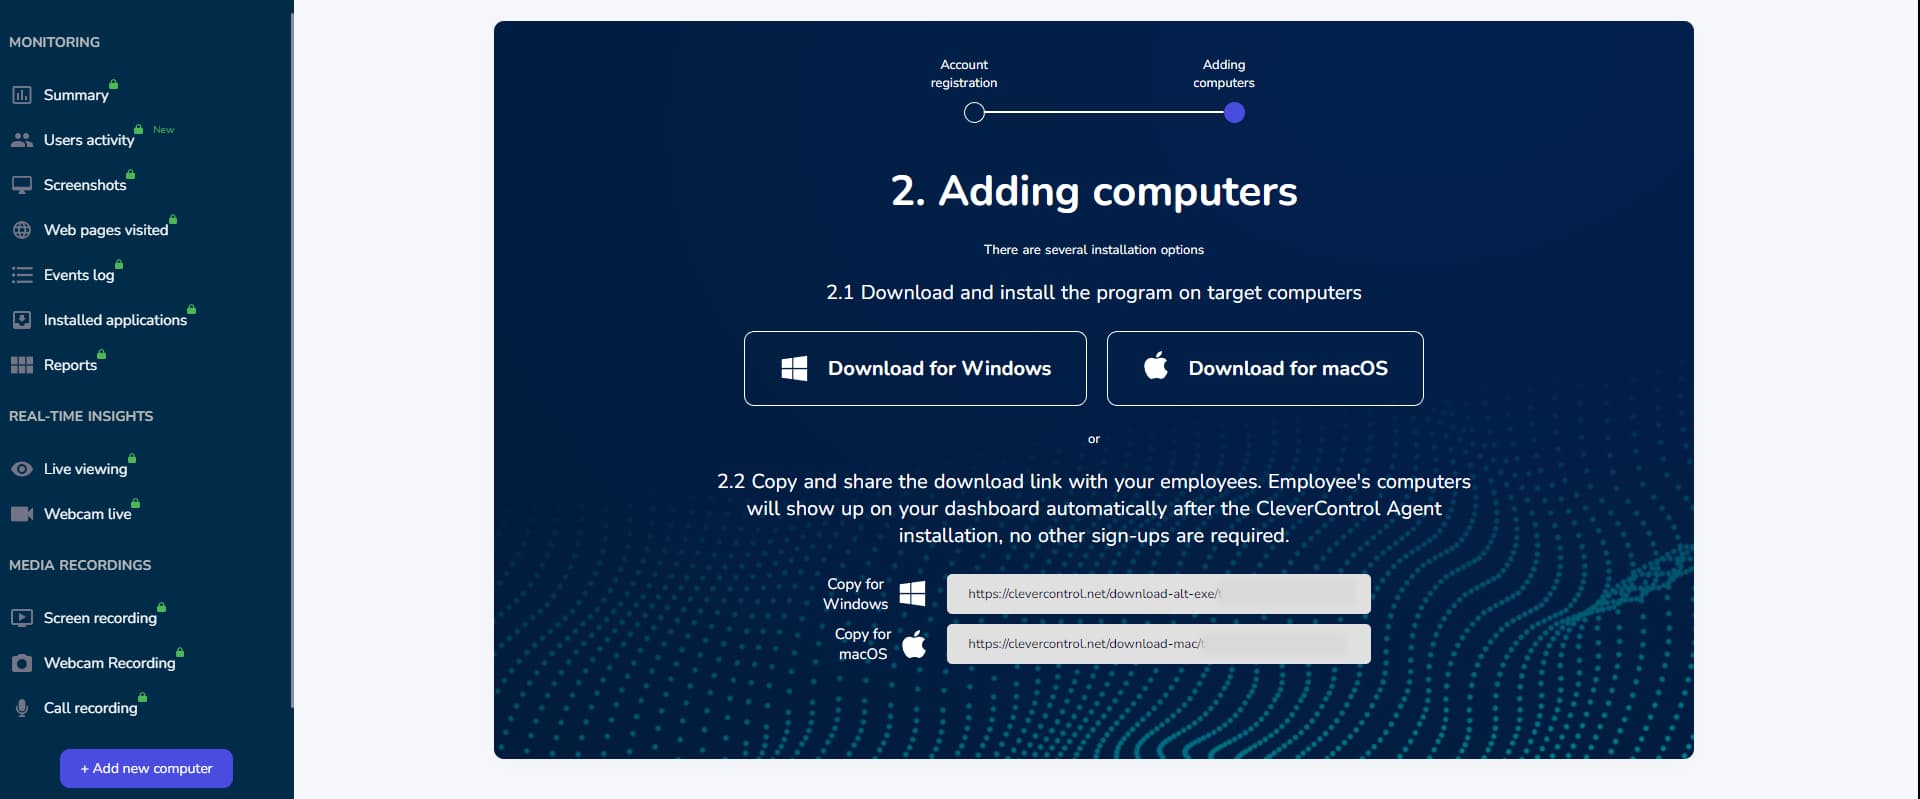
Come aggiungere computer all'account
Adding computers to your CleverControl account is easy and takes only a few minutes. Here's how:
Select Your Operating System Version:
- When you log in to your online account, you'll find instructions on how to add a computer.
- Important note: You should install CleverControl only on the computers you are going to monitor. Installing the program on the admin computer is unnecessary.
- Choose the appropriate version for your operating system and download it.
Later, you can use the "Add New Computer" button at the top to download the installer file and add more computers to the account.
Installing CleverControl on Windows:
- Run the downloaded installer file on the computer and follow the instructions below.
- Guida all'installazione di Windows
- Guida all'installazione di macOS
- After the installation, the program will automatically connect to your account. The monitored computer will appear in your account within 5-10 minutes.

Come visualizzare i rapporti di attività
Tutti i dati raccolti sulle attività sono disponibili nel vostro account online. I dati sono filtrati in diverse categorie, come ad esempio Screenshots, Visited Websites, ecc. per comodità. La maggior parte di queste categorie si trova nella sezione Registro degli eventi section.

Per visualizzare l'attività dettagliata di un utente in ordine cronologico, passare alla sezione Registro degli eventi e selezionare Tutti gli eventi within this tab.
Per una panoramica dell'attività tra gli utenti, andare alla sezione Sintesi tab. By default, it displays summary information for all connected computers.
Per concentrarsi su dipendenti o computer specifici, utilizzare l'opzione Tutti i computer filter at the top of the page.
Adjust the summary period as needed with the time filter.

Come esportare i dati dal dashboard
Exporting data from the CleverControl dashboard is a straightforward process. Here's how you can do it:
- Passare alla sezione Rapporti tab on the dashboard.
- Fare clic sul pulsante Richiedi un nuovo rapporto button to initiate the export process.
Customize your report. In the options, select:
- The specific period you want the report to cover.
- The user or users whose data you want to include.
- The type of events to be incorporated into the report, such as all events, screenshots, visited web pages, etc.
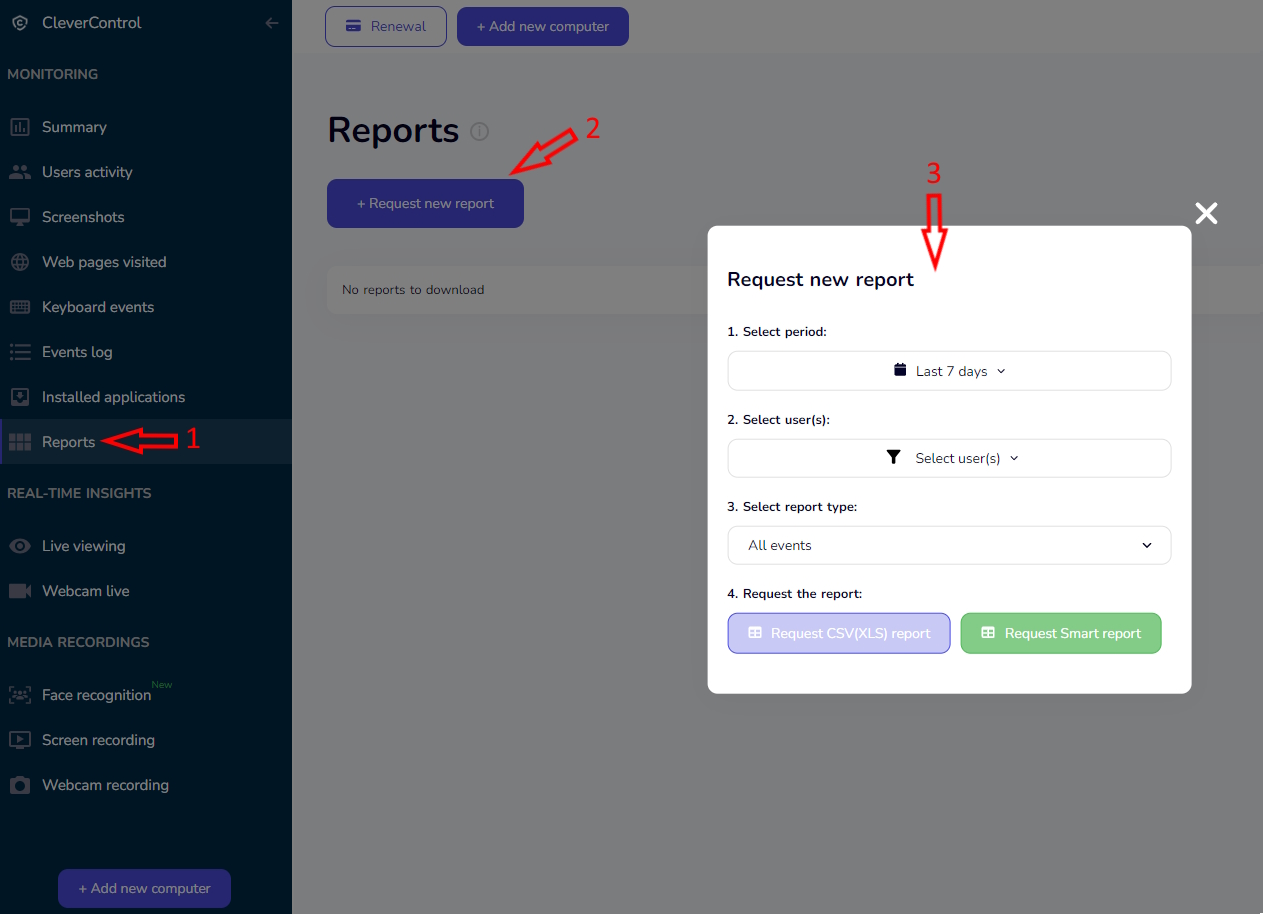
Choose report format. You have two options:
- CSV Report: Contains text-based information like keystroke logs, website history, and search queries.
- Smart Report: Includes text and media logs, such as screenshots. Note that Smart reports are downloaded in .zip format and require extraction using freely available software like 7-Zip.
Download and review:
- After selecting the desired format, click the button with the chosen type of report.
- The report will be ready in a few minutes. When it is ready, you can download it on the same page.
- Please be aware that neither CSV nor Smart reports contain summary activity or user statistics charts.

Come modificare le impostazioni di monitoraggio
You can customize CleverControl settings to optimize employee tracking. Tailor the configuration to your specific needs for enhanced monitoring efficiency. Here is how to do it:
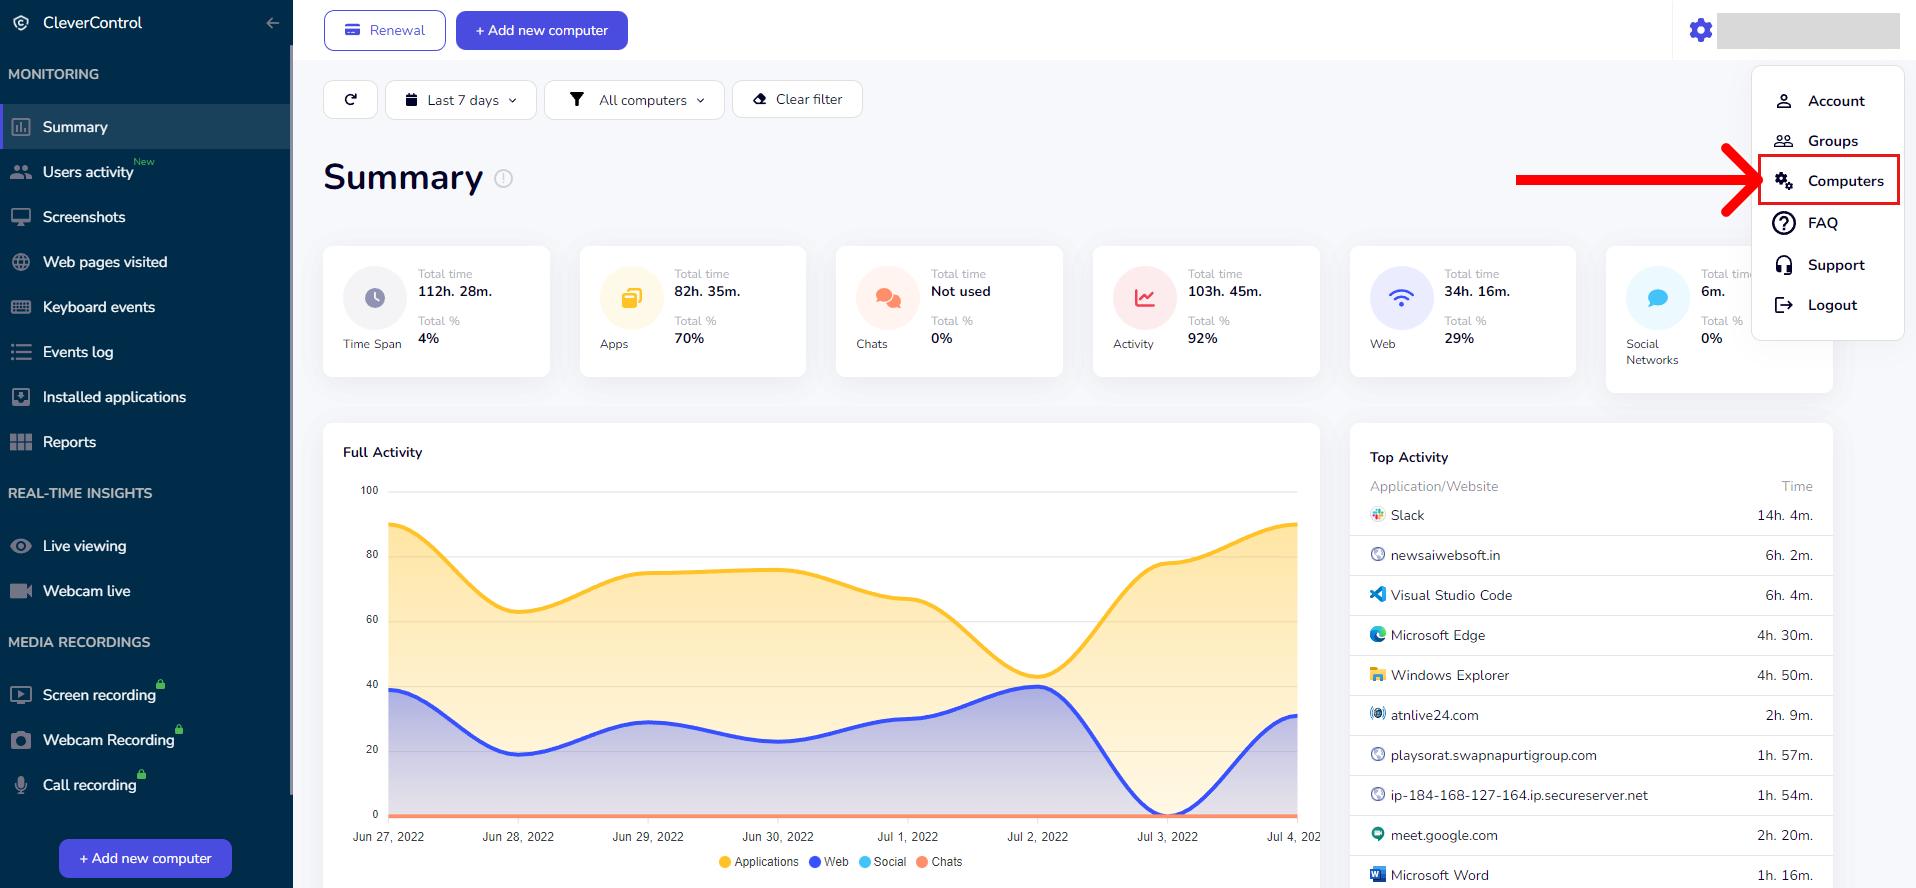
Access Monitoring Settings:
- Click on your email address in the top right corner of the dashboard.
- Nel menu a discesa, selezionare Computers.
Manage Computers. You'll see a list of computers connected to your account. Here, you can:
- Edit each computer's name.
- Start or stop monitoring for the entire computer or individual users.
- Enable or disable additional tracking features, such as Screen, Webcam, and Call Recording.
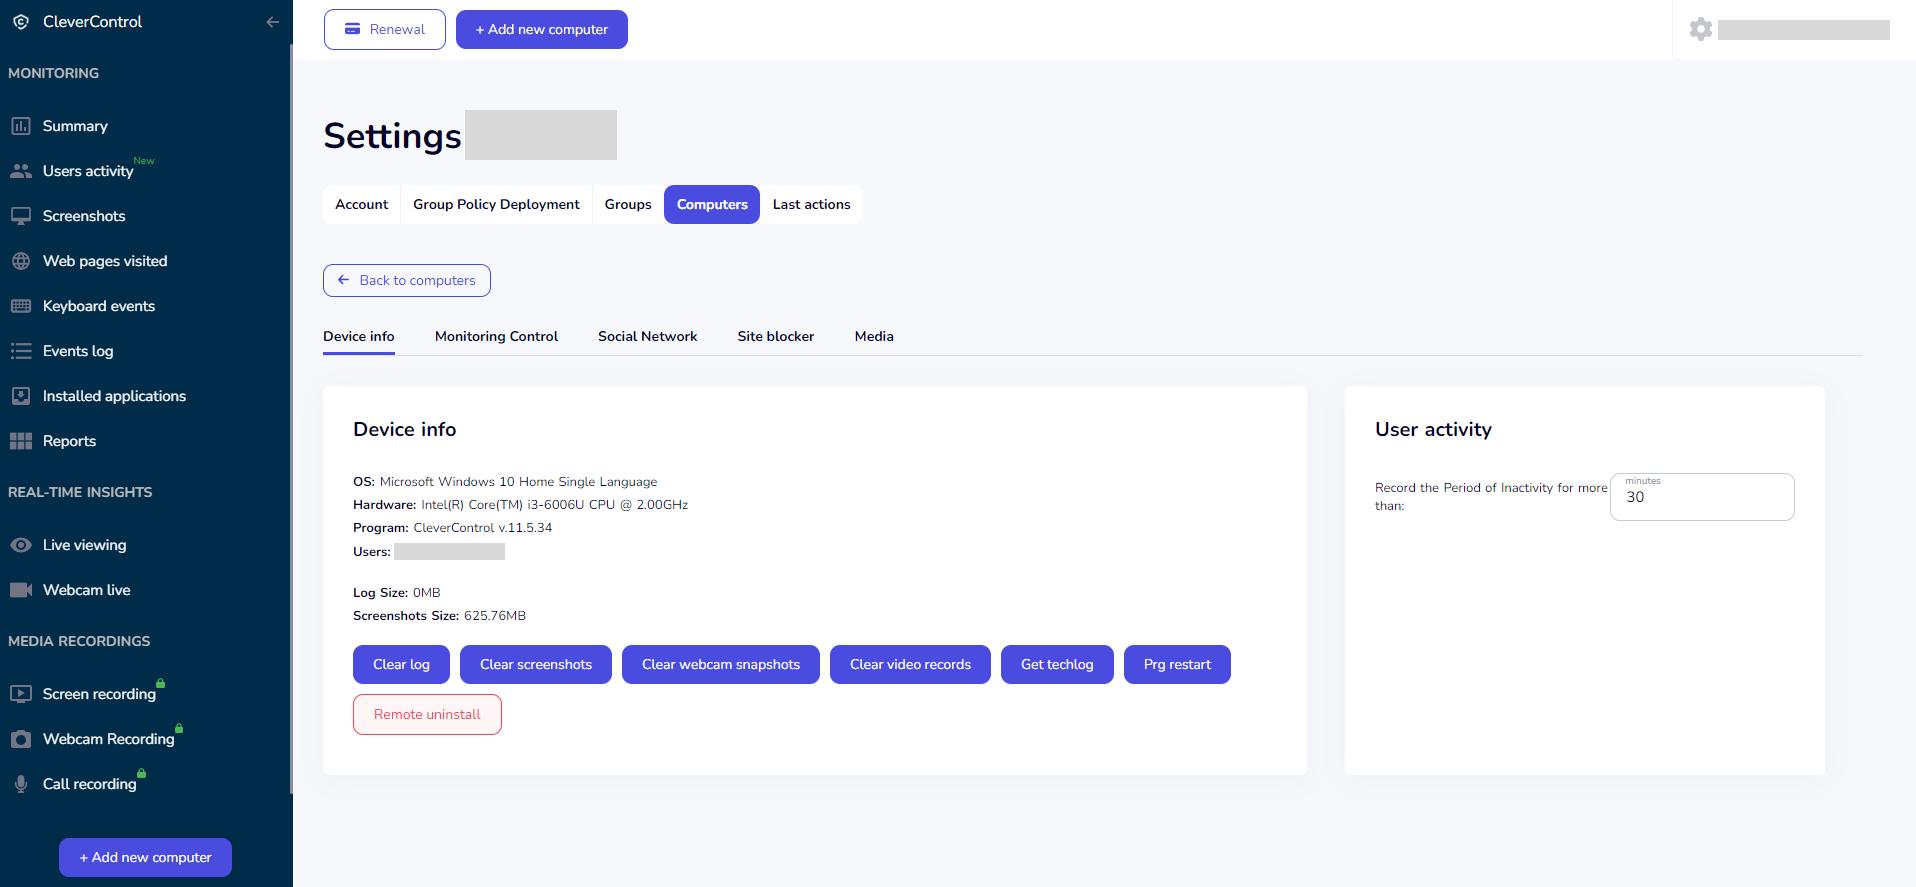
Fine-Tune Settings. To further customize monitoring settings, click Setup Computer below the computer's name.
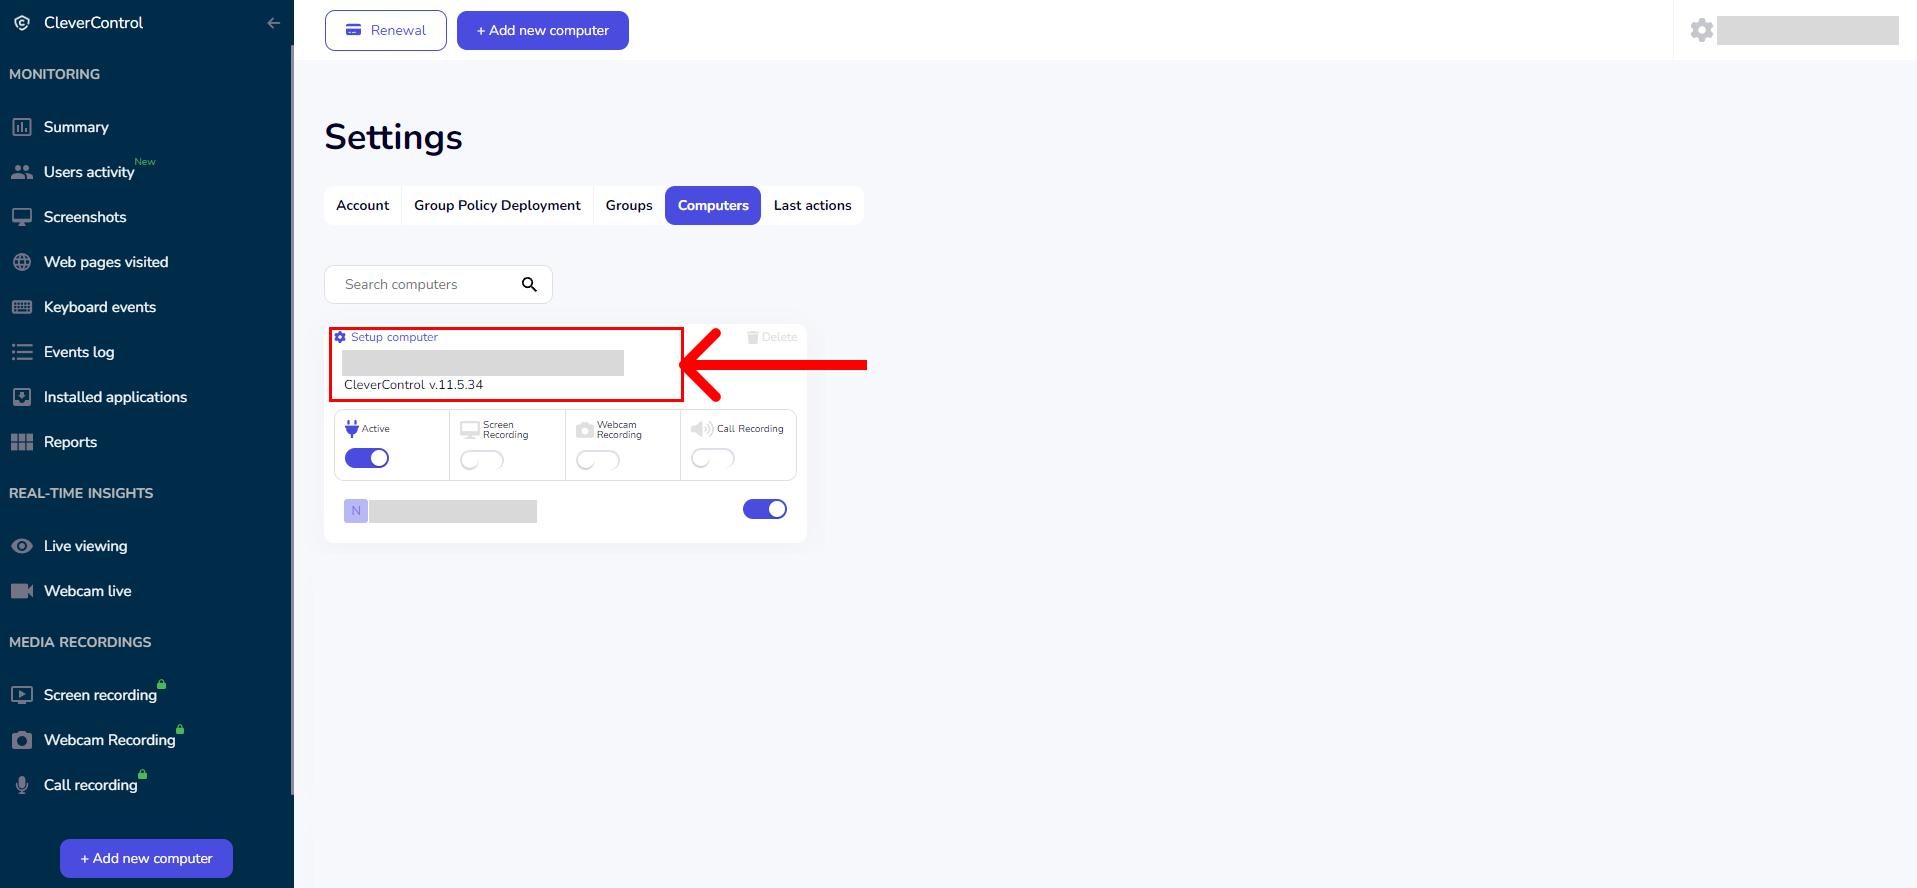


Settings are categorized into six sections for convenience:
Device Info: Provides information about your operating system and CleverControl agent version. You can also clear specific log types from the monitored computer or block the program remotely by clicking "Remote Uninstall". This button does not delete the program from the target computer, however, it stops monitoring. Uninstallation can be completed only directly on the target computer.
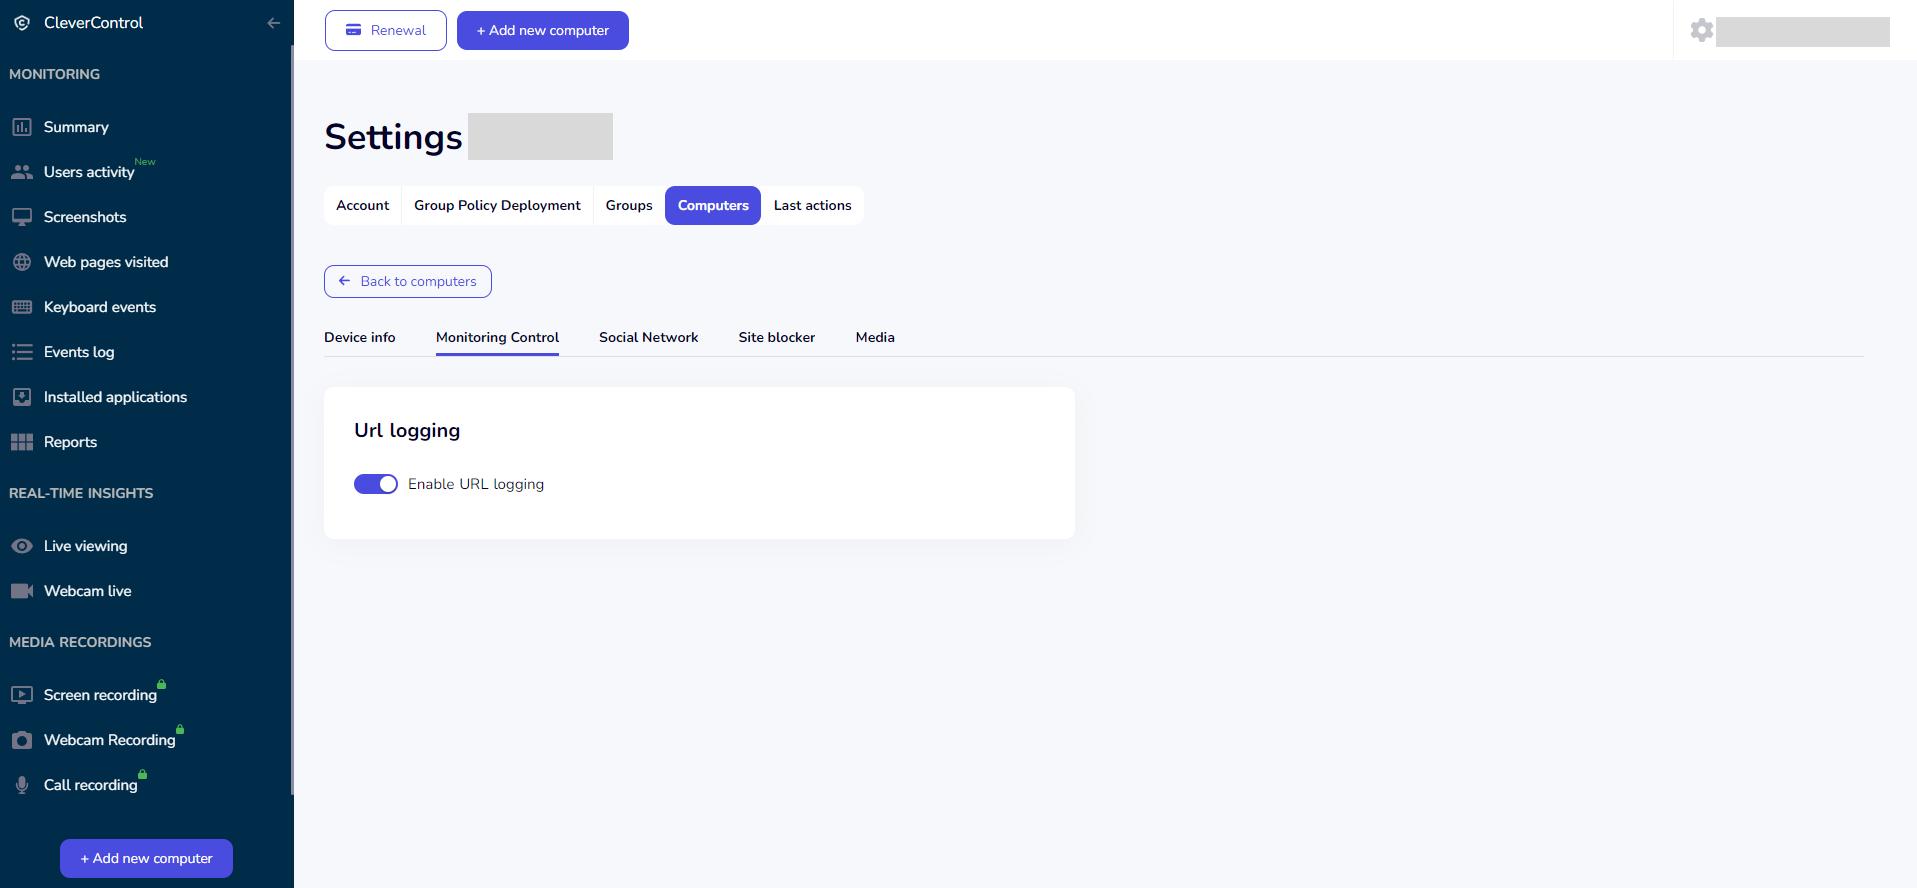
Monitoring Control: Manage keystroke logging, clipboard events, and URL tracking.
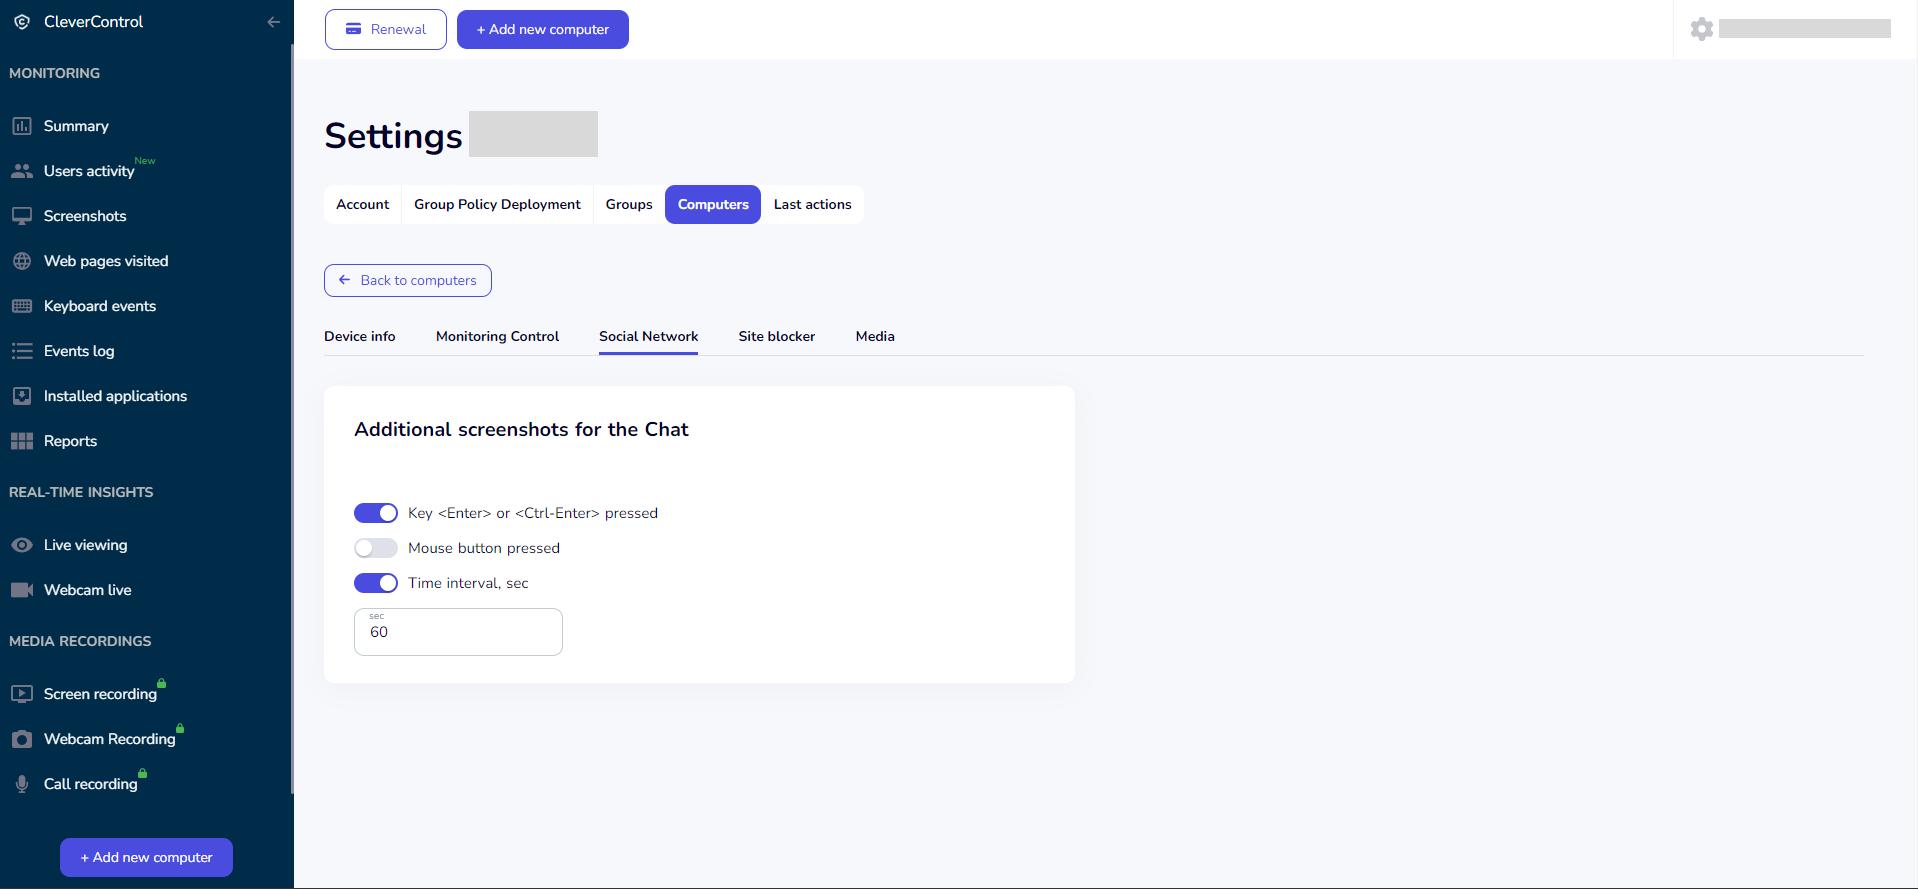
Social Networks: Configure additional screenshots for chats and set screenshot triggers (time intervals, Enter key, Ctrl+Enter, and mouse clicks).
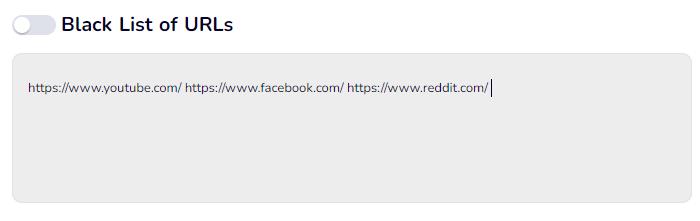
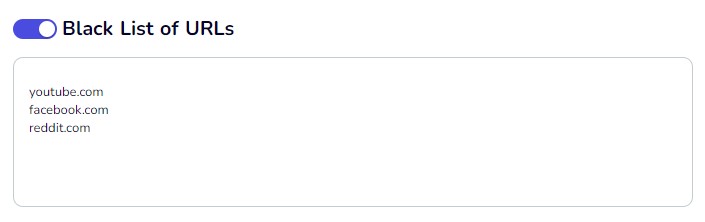
Site Blocker: Block access to unwanted websites by adding their URLs to the Black List.
Bloccare categorie di siti web utilizzando Black List of Categories.
Si possono anche specificare parole chiave nel campo Lista nera di parole to block sites containing them in their URLs.
Il Lista bianca option allows you to leave access to a site, even if it belongs to a blocked group.
For example, you can block all social networks while leaving access to facebook.com.
Per bloccare tutti i siti web tranne quelli consentiti, controllare l'opzione Whitelist di soli URL option and enter allowed websites in the field below.
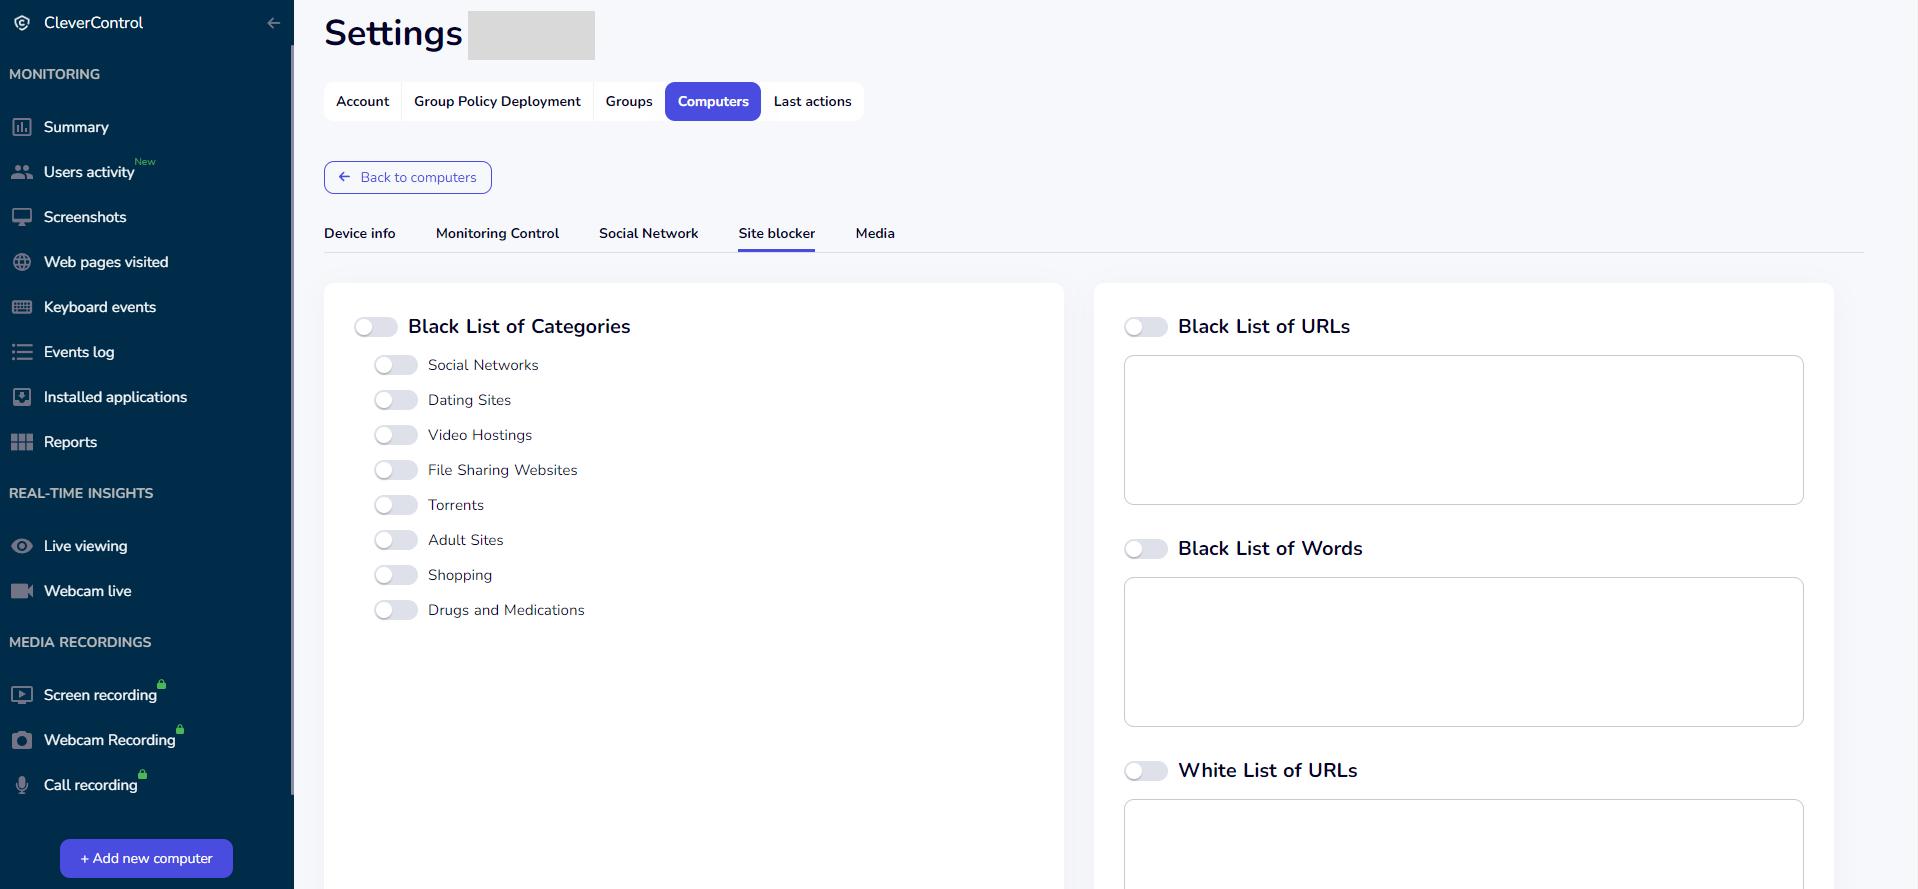
Nota importante: You should enter website URLs without www. or https:// in the Site Blocker settings. If there are several sites, you should type in each one on a new line.
Media: Configure options for screenshots, webcam snapshots, and audio/video recording:
- Customize screenshot triggers (window change, URL change, clipboard change, and quality).
- Select a web camera for a live webcam stream.
- Set webcam snapshot capture options.
- Configure webcam video recording.
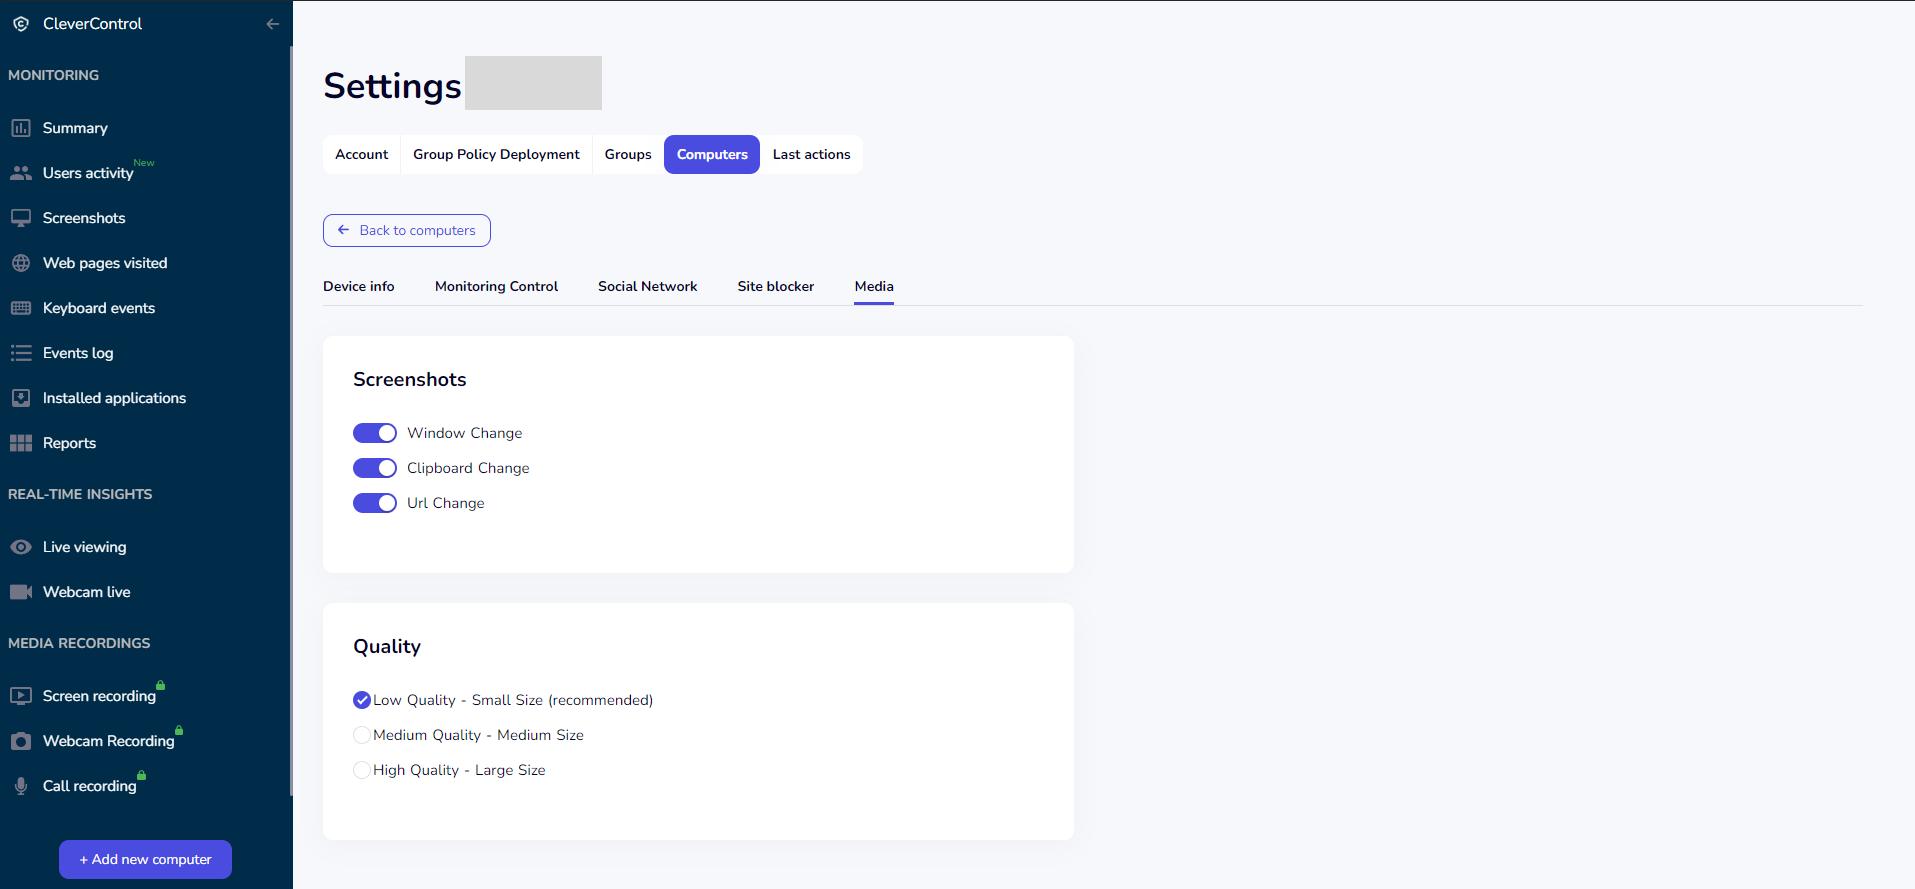
Note on Media Settings:
- Options for live webcam viewing, webcam video, and webcam snapshots are related. Enable only the features your organization actually needs to avoid unnecessary duplication.


Come disporre i computer in gruppi
Organizing multiple connected computers into groups for ease of management is a practical feature in CleverControl. Here's how you can do it:
Access Group Management:
- Click on your email address located in the top right corner of the screen.
- Dal menu a discesa, selezionare Groups.
Create a New Group:
- Per creare un nuovo gruppo, fare clic sul pulsante Aggiungere un nuovo gruppo button.
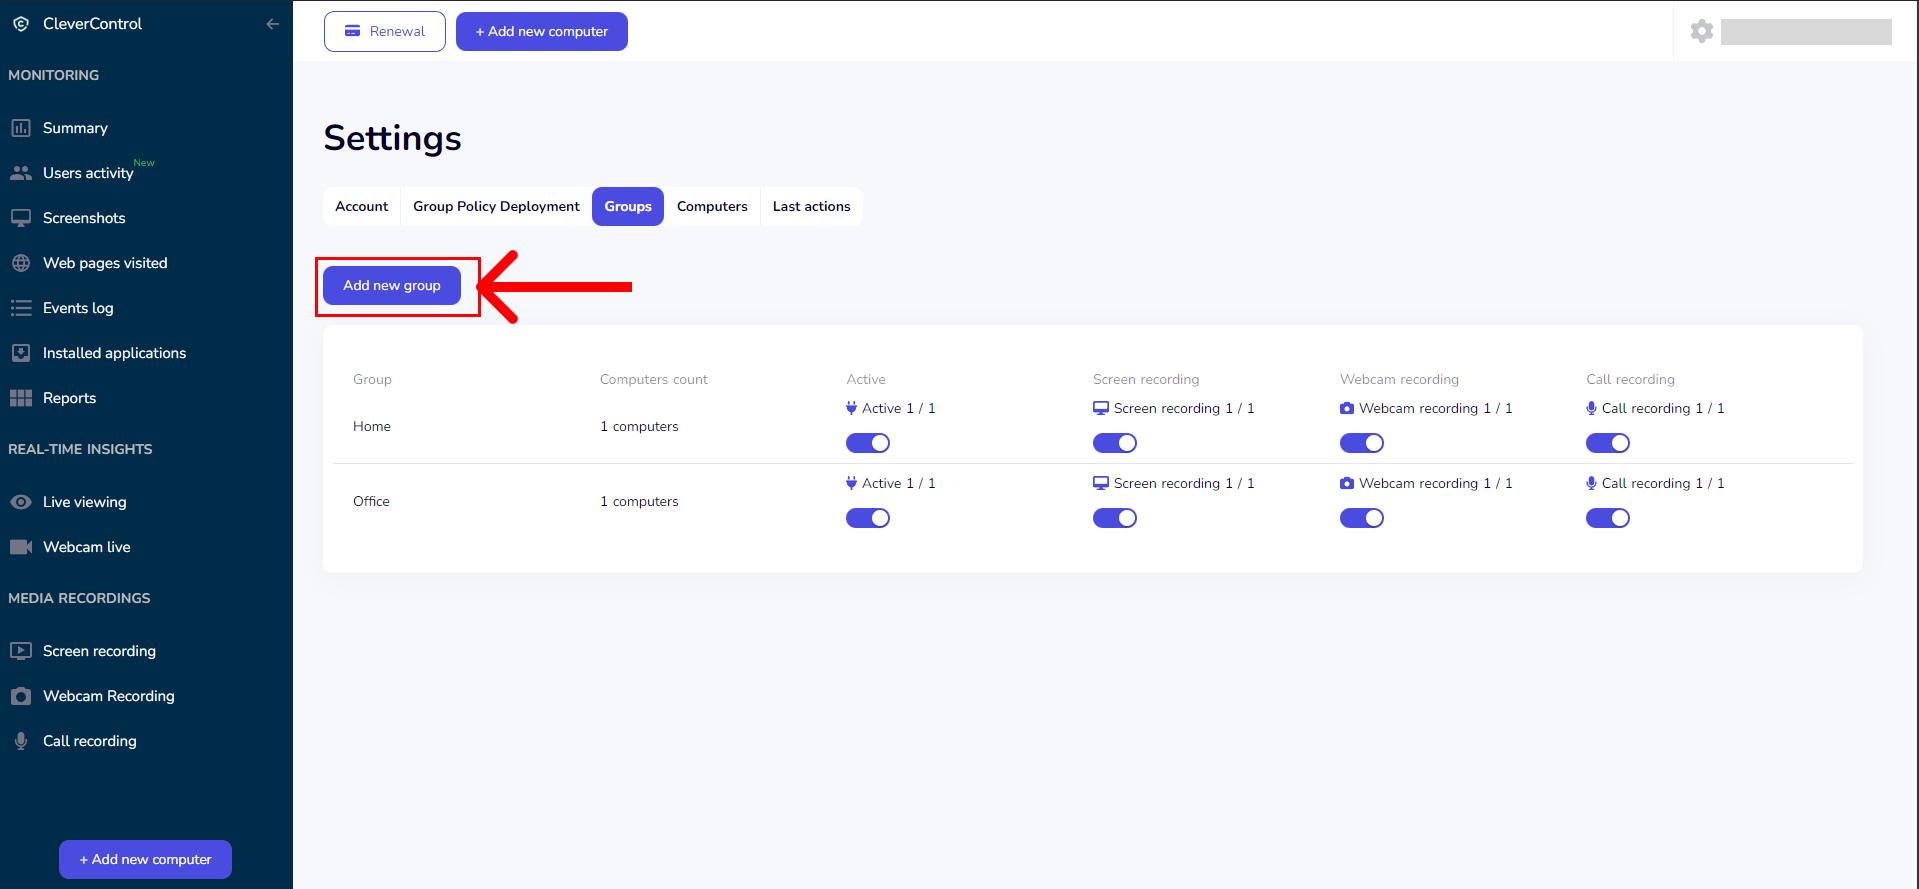
- Enter a name for the group.
- Check the computers you want to include in this group.
- If you have previously created groups, you can use the "Computers without groups" toggle button. It allows you to identify computers that have not yet been assigned to any group.
- Per creare un nuovo gruppo, fare clic sul pulsante Aggiungere un nuovo gruppo button.

Come eliminare il programma
To uninstall CleverControl, follow these steps based on the monitored computer's operating system: